svg cuts banner

Wednesday, February 20, 2013

I Spy Spring

Hi everyone,  

SVG cuts Facebook page has yet another challenge going on and the winner wins a Sizzix Eclips bundle. I really like the way the new challenges are as it makes me think hard. You can only use the designated kits and shapes. That makes it even more of a challenge and guess, what I like it.
Before we could use any of the kits and enter as many times as we wanted. Guess that was too much for me. I remember when my kids were little and they're rooms were trashed and I would tell them concentrate only on one part of the  room, before you know it you'll have the whole room clean. Don't look at the whole picture. I think God does that with me. He only lets me see a tiny speck of what is up ahead.  Just as my children, I will see the whole picture and become overwhelmed. I can't tell you how many times I went back into the room and the kids were playing in the mess because they became overwhelmed. That is the way it was for me with being able to choose from all the kits and shapes. I couldn't concentrate on one thing. That is why it took me so long to post the picture of what I had entered. Here is my entry and no sorry, I  won't tell you what I did to make it. I'm challenging you figure it out!  Be sure and check out SVG cuts, it's a fun group of people and you will find very crafty men and women there. Thank you so much for stopping by and reading my blog and Happy Craftin' Y'all!

Tuesday, January 29, 2013

A Message of Love

Morning everyone!
A huge thank you to all the people who liked my card! I have to say I have never had 297 Likes and 96 comments on something I made before. My neighbor of 20 yrs is celebrating her 93rd birthday this year. She has not been "home for the last two years and I am so aware that this may be the last card I ever make for her that I wanted it to be special. I was sort of stuck so I looked on pinterest which is what I do when I am stuck for ideas. One of my favorite card makers had posted a very pretty card and I thought it would be perfect for Ellen. The only problem was I didn't have those memory box  die cuts she used. So I did what ever creative person would do I improvised. I have been very blessed to find the Sure Cuts A Lot program and SVG Cuts. So when I find something I like or want to make I go to my files from SVG Cuts and use my knowledge all be it not vast on Sure Cuts A Lot and make it using Mary's amazing files. So here it is.
First I took the picture and put it on my desktop so I could refer to it as I "designed" (i use that very loosly) the cut out for the card. I imported two ovals from the shapes menu and set one inside the other. Here is the cut sizes on that. Oval 1 is W 3.138 x H 4.918 Oval 2 is W 2.720 x H 4.840  I did not weld these shapes nor did I click keep proportions, on either side of the top of the oval I added Wheatfield Swirls from Mary's Swirlies SVG Collection. The wheat field Swirls are cut at  W 1.569 x H 2.723 copy and paste another then flip it and weld to the outer oval where you want it. I used Swirl sm 4 from the shapes menu imported at W0.942 x H 0.791 copy and paste another then flip it as well and weld where it looks good to you also only to the outer oval. Select all and group all the shapes together so it is easy to move if necessary.
 The vines we made by using Flourish Sm number4 from the shapes menu as well, from the Sure cuts a lot program.  I used the Azalea leaves from 3D Flowers SVG Kit that Mary designed and broke them apart to set the sizes at lrg leaf W.0492 H.0.895  Sm leaf W .0641 x H.0.712 I moved these to where I thought they would like nice and welded them to the vine. Here is where I had trouble with my computer or the program not sure which. Every time I tired to preview it the program shut down. Just keep opening it back up but make sure you save every now and then so your not in danger of loosing all the work you had done. The flower is the Impatient from 3D Flowers SVG Kit Part II cut at two sizes and on these I did click keep proportions. Lrg. is W 1.389  sm is W 1.150 . The centers are from the 3d flowers one in the extras file I cut number 4 at W 0.686 x  H 0.677 I cut the white "square" from Simon's Simple Square Cuts another of Mary's useful files at W 4.539 x H 6.322.
 I used my McGill flower shaping tools to shape the flowers, then glued them together.  I glued the cut oval shape to the white background and glued the vines in cross fashion. I did glue only the outer edges of the oval at first to see if I wanted to curl any of the swirls which I did.
 I used tiny white pearls from Michaels and perfect pearls was spritzed on the whole card once it was all glued and flowers shaped and such to give it a extra glitz to it. Then I glued the bow on the top and the extra from the ties in various places as it appealed to me. I did use my hot glue gun for that but I think it would hold better if I had used Glossy accents or Crystal affects. The card base was a piece of Cherry Cobbler card stock from Stampin up.
 That is how this card came about, that and a desire to make something special one more time for her. We have fought like cats and dogs at times but through this I have learned to let it go that life is fragile and people act and react because of things in their past that may have caused them to be wounded. In the grand scheme of things, it really doesn't matter. What matters is that we learn to forgive let it go and love that person anyway. Thanks for stopping by and reading this. Please stop by SVG Cuts Facebook page and show Mary and Leo the love they deserve. They have made some amazing files for us to design with and it just keeps getting better and better. Thank you again for all the "likes". Happy Craftin' Y'all!
 Blessings, Sharalyn

SVG Kits and Collections Used:
Swirlies SVG Collection
 3D Flowers SVG Kit 3D Flowers SVG Kit Part II  
Simon's Simple Square Cuts      

Note: As of September 24th 2015 she is still with us. Another lesson, don't count anyone out till they are out. :)

Monday, December 10, 2012

Info on Lamp posts


Morning all!
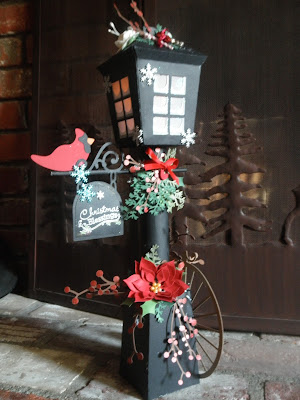
I have had several people ask how I made the Charles Dickens type lamp posts and really I cannot take credit for that. It was a very own Thienly from SVG cuts Design team who came up with that awesome idea last Christmas. This year she made another awesome design I am itching to get to. It is a sled. AWESOME!!!! Anyhoo I told someone I would try to put in some of the specks of the embellishments I used for the 7 I have made so far. I currently have two more cut and ready to put together.. Seriously in need of a paper order right now I have made so many...
Many of you know I got the machine I was hoping for the silhouette Cameo a few months back so some of the things I used on these were cuts from silhouette. The sticks and berries, the star berry wreath. The rest is from our very special Mary who makes these awesome cuts for us to design with! Bless you for that Mary!
First the How to's to make the Lamp post are on the SVG cuts Blog just type in lamp post on the search part of the blog and it should take you right to the instructions. The rest I used the ferny greens and the spindly poinsettia from 3d winter greens the cardinal on some was a freebie from svg cuts and I used my copic markers to color some of the pearls to match my colors and smooch in the nail polish bottles to color some of the berries others I used glitter and a pen type glue to add the glitter. Some of you already know I adore my flower shaping tools from EK Success. I use those a lot when I make my stuff and in fact need to order some more as I made the mistake of using them to hold things in place when hot gluing... don't do that it ruins the tips.. The snowflakes I have used on all of them were from Michael's and are from their recollections stuff.. very hard to find so next year grab them up quick cuz I am buying a ton next year!!!. Buttons from Buttons Galore is another fav of mine but I have yet to try Tamara's pretty buttons from paper play. Dying to but well you know how it is .. I stamped the card stock vellum with a snowflake stamp and Versa Mark then used Stampendous Kaleidoscope transparent embossing powder and embossed the snowflakes on the "glass". I used Stampin ups heat and stick and Art glitters ultra fine transparent crystal glitter( another fave of mine) to make the snow glittery. On the berries I used a red glitter I had from Martha Stewart but I would love to get some from Art glitter as in my opinion that is the best glitter  I have ever seen. I used copper ink for inking on the brown lamp post and silver on the charcoal colored ones. I think that is all I did, but just did what  I do other wise to decorate them I don't know. If I forgot something just ask..My hubby says I get in a zone.. LOL well if that means I don't hear him when he talks to me then I guess that is true. Hope this helps, Seriously have fun with these they are a blast to make and as soon as I get the last two done I am trying that sled.. AWESOME!!!! Thanks for stopping by and thank you for asking how I did that. Always fun to share ideas! Have a great day and Happy Crafting.. and YES DO check out svgcuts.com! SUPER creating opportunities.


Wednesday, November 21, 2012

Penguin Slide!!!


 Mornin' Y'all,
I made another creation for the Christmas Challenge on SVG Cuts Facebook page.
I hope you enjoy this little guy.

 I use is American Crafts Card stock and I will list colors I used as I go. 
I used the J from 3D Letters SVG Kit cut at the size it imports.I also cut an extra middle piece and cut off the sides to cover up the snowflakes I added later. I used pool AC card stock for the slide. I stamped and embossed the side pieces, with white snowflakes using white embossing powder Versa Mark.
 I used a standard hole punch to punch holes in the side pieces for the wooden dowel I would use later. Please don't do as I did, make the holes before you put the one side on and realize you need to make your holes. I embossed on the front of the J but not the side pieces.
Cut the snowflake tops only from Kate's Holiday Silhouettes SVG Collection, in the presents and peppermint card.  I cut about 5 of those but use your artistic eye for what you would like and where you want to adhere them.  Using the " J2 " piece and cut the edges that would connect to the j pieces off then cover up the white flat part of the snowflake.
Cut 2 of the support for the Ferris Wheel from Summer Street Carnival SVG Kit  at  6.583 H
Cut 6 of the support 3 at: 6.268 H, Glue three together for support on the inside like Mary does. Since I wasn't adding much weight I didn't do more than that. I cut that out of Lagoon AC card stock, as it was a closer match to the Echo Park Christmas paper I had with snowflakes on it but use whatever you have that you like. The Accents were cut at 6.020H and the bottom piece was cut at 6.281h the liner was cut at 3.105 H. Glue the support together as Mary instructs in the video for Summer Street Carnival SVG Kit and then I cut a dowel about 6 inches long and painted it red.
 While it dried I made two of the Poinsettias from Kate's Holiday Silhouettes SVG Collection in the extras file. Petals are cut at 4.784 H. The leaves are cut at 2.584 H I cut the centers in a bit to make it easier to shape the petals better. I Inked the edges of the leaves with green and the petals with red but I think both would have looked better if I had done it with a slightly darker color than the paper. The color I used for the leaves was Pine AC card stock, and the petals were cut from Crimson AC card stock.  I used red small pearls from Michael's for the centers.
 Cut two .75H circles from the shapes menu on the Sure cuts a lot, and glued them to the  end of the first stick. Slide through the holes on the J and then glue the other circle on.  Adhere the flowers onto the circles. I used my hot glue gun it holds better.
 I cut ferny green pieces from 3D Wintergreens SVG Kit to make it look like snow on the slide. Those where cut using White AC card stock at 4.607 H.
 Import all the pieces for the tickets and size to 2.273H. Assemble the ticket pieces and hot glue on where you like.
 The tree was from Christmas Ornaments SVG Kit and sized at 6.270 H as before, import all your pieces and select all then you should get all the pieces at that size. I had some pretty snowflakes I got from Michael's, glue them back to back then glue to the top of the tree for the topper. I squirted iridescent clear Stickles on the tree. Hot glue the tree to  the back of the stand and some of the leaves to the side for stability.
 The penguin body is the slipper from Clara's Christmas Eve SVG Kit and was cut at 3.590 H. I didn't put the accents on the slipper as I felt they were not necessary. The penguin"face" is from Christmas cuddly friends and was cut at 3.277 H. I imported the black and sized it first, then sized all the other pieces to fit it. It is better to size it all at once. I used black, white, crimson, wave and apricot as my colors. I used pink chalk for the cheeks.
 The "sign" was made using the Christmas ball in the extras file from Kate's Holiday Silhouettes SVG Collection cut at 2.155 H out of pool  AC card stock. The white circle is cut at 1.333 H. I cut the topper out of some sliver paper I had at .517H. I used some sliver ribbon I had in my sewing stash, for the bow. I wrote the words" penguin slide "on it and the 10cents or 10 fishes.
  I think that is everything. Mary has some amazing files and I love that you can do so much with them. That is part of the reason I love the challenges this way as it gets my creativity going. Thanks for stopping by and reading this long post. If you make one please post it on SVG Cuts Facebook page.Thanks again and Happy Craftin' Y'all! Blessings, Sharalyn

SVG Kits and Collections Used:
 3D Letters SVG Kit
 Summer Street Carnival SVG Kit
 3D Wintergreens SVG Kit
 Christmas Ornaments SVG Kit
 Clara's Christmas Eve SVG Kit
 Kate's Holiday Silhouettes SVG Collection

Monday, November 5, 2012

Ink Stains!!!


 Hello all,
Well it is day 6 of the online card class and I have green ink stained fingers to prove it! I had really tried not to purchase a lot of the things they use in the classes and really try to use the stuff I had. I have pretty much stuck to that, although Micheal's did have a buy one get one free stamp thing going until the 10th so I did get two  new Hero arts clear stamp sets. One is tags since i didn't have any and some more much needed phrases for insides of cards and such. The one I really was interested in had angels but of course our Micheal's didn't have them. Also no more than about 6 different Tim Holtz distress inks and really none of rest of the stuff I was interested in. When I was asked if I was finding everything I mentioned that I was interested in a color of distress ink that had been out since summer but she had no clue and then I made the mistake of asking about a Hero Arts background stamp that was Christmas! That made her disappear and never come back! We were encouraged to go to our local craft shops but really what is the point when they look at you all fuzzy eyed like your speaking a different language??? anyway enough ranting! Here are some of the cards I have been working on and have not posted on here yet. Thanks for stopping by and I promise not to rant again. Blessings Sharalyn

Friday, November 2, 2012

A short Note

Good day everyone,
I have been trying to catch up but I think It might be hopeless. I just finished another card from day 3 and I am hoping to get a couple more done as we are on day 5. Yikes! On this card I made my own plaid background using stamps I had and I like the way this one came out too. Now if only Kristina and Jennifer could come to my craft room everyday and provoke me to get this done it would be great. LOL just kidding. So here are my cards and I hope you like them. If I wanted I could go to the class even after it is over and get inspired everyday but it is fun to be spurred on by others in the class as well. So much creativity going around you just want to soak it all up like a sponge. Mannie made his appearance so to speak. We heard him as quite the chatterbox kitty today. It brings a smile to my face to hear him. There is still time to join us we are only half way into the class. Lot and Lots of inspiration! Thanks for stopping by and sitting a spell. Have a great day!

Thursday, November 1, 2012

Still catching up!


 Hi Everyone,
well we are on day 4 and I just got day two cards done. Hopefully tomorrow and the rest of this evening I can get caught up more. This one took some time but had a extra benefit as I learned a bit more how to use my silhouette program I bought. Class is going by so fast and if you have never done these before you really should give it a try. I have learned so much and even if you have been doing cards for years there are others knowledge you can benefit from. Any hoo here are my card for today. I hope you like them. Thanks again for stopping by.