Morning Y'all!
I am hoping November brings us our cool temperatures and I am able to craft full time again. Life has been a bit crazy!
Today I am bringing to you a lovely card from Dreaming Tree, called a Bendi Card. Honestly I had no idea what that was, I guess I have been caught up in my own little world but I love the concept of it. The idea is the front is bent and held into place with the slots so the card can stand. The Believe card from this collection was so cute and of course I had to add my touch to it. So here it is and I hope you like it.
When I saw this card I knew I wanted to do a blended background for the sky. Using Tim Holtz Inks I blended broken china, seedless grape, chipped sapphire and black soot. Go light on the last one and just around the top of the card to add that dark sky look.
Then I spritzed the paper with perfect pearls and water and dried with my heat tool.
The paper may curl a bit but if you use your heat tool you can get it back into shape. It helps to put a paper over your ink blending and something heavy like books or something to flatten it a bit while you work on the rest of the card.
Note: I did not blend all the way down the card but checked to see where the trees would cover and stopped just below it.
The trees looked great but I thought that some green needed to show through so I added a few strokes of my YG63 Copic pen. Then to add a some sparkle to the snow, I added Star Dust Stickles. I used this glitter glue a lot on this card, using it around the fence on the snow bank on the snow man and adding squiggles to the snow for a moon glistening affect.
The paper Collection I used was Simple Stories Cozy Christmas. This is a paper pack from last year but I just loved it and really haven't bought anything new yet this year. I used the brown on the fence because to me fences are brown. The holy is a patterned green paper from this pack as well as the berries. I added Glossy accents to the berries for shine. Set aside to dry while you work on the rest of the card.
I wanted the lead reindeer to have a red nose so using xmas red stickles I added it to the nose and then to Santa's hat as well. I used Ranger White Enamel for the tip and around the cuff of the hat for the fur. I then added tips and swirls of a Clear Wink of Stella pen to the sleigh and reindeer at their feet.
From this paper pack I found a nice paper that worked well for the moon to have a glow affect. A small scrap was adhered to the back of the card then the blended background was glued into place. The trees were adhered then more squiggles of Star dust stickles. Make sure you give these extra touches time to dry before you glue them into place.
I found the arms in the extras file and using the same paper I used for the fence I cut out the arms and glued them into place. The hat and the scarf just didn't seem right to make them both red although I liked it. I made the scarf green and the hat black adding some stickles to the hat brim and the top.
I used 3d glue dots for the believe, sleigh, snow drift and the berries on the holly.
The enamel dots were from this collection as well.
I really liked the clean look of this card as Leo and Kyle showed it but for me it needed a little more bling. It is just my take on it and I hope you enjoy it. Thanks so much for stopping my and reading my blog. It has been a challenge typing this while a young kitten disconnects your extra monitor cord and runs on the key board and such but I am so thankful to have a kitty again. Thanks again and Happy Craftin' Y'all!
Blessings, Sharalyn
Dreaming Tree svg Kits Used:
Christmas Bendi Cards
Supplies Used:
Bazzill Card Stock: White
Neenah Solar White Card Stock (sky)
American Craft Card Stock: Black
Simple Stories: Cozy Christmas Collection
Simple Stories Enamel dots
Ranger Stickles: Star Dust, Xmas Red
Ranger Enamel Accents: White
Ranger Glossy Accents
Tim Holtz Distress Inks: Broken China, Seedless Grape, Chipped Sapphire and Black Soot.
Tim Holtz: round blending tools
Zig: Clear Wink of Stella Pen
Sakura White Gel Pen
YG63 Copic Pen
kool tak clear foam pads
Scotch Quick Dry Adheisive
Silhouette Cameo Cutting Machine
Tuesday, October 27, 2015
Wednesday, October 7, 2015
Pumpkin Smile Card
Mornin' Y'all!
I apologize for not posting for so long but my kitty I had of 7 yrs passed away from early feline kidney disease. I was to sad to even think about crafting.
Now we are in the process of adopting a new baby, a boy this time whom my husband has named Opie. We are thrilled to have the pitter patter of little kitty feet again.
When I saw the newest kit, Barn Party SVG Kit, I just knew I wanted to make the card for Mark's mom. We have had an event filled summer. Mark's mom broke her hip and though she has had a partial hip replacement, at 95 she knew she just couldn't live alone anymore. She has moved to a senior assisted living physicality only 5 min. away from my sister in law in San Dimas California. Not having her so close anymore I wanted to make this Halloween card for her. This card is just to cute for words but of course I had to add my own twist to it. I hope you enjoy it. Please read the instructions before you cut anything.
I started with the Barn Party SVG Kit and opened the Haunted Barn svg, where I imported the corn_stalks svg to my virtual mat. Using my knife, I cut off the bottom portion of the corn stalks. I sized the cut corn stalks to W 4.910 x 1.397 H. Resize your trim pieces by reducing the height a bit. I took off 0.125 from the height. Use your calculator to figure out what you need to enter in the height measurement. The orange trim was sized to W 4.500 x 1.056 H. Now you do the purple trim using this method. You will need to uncheck the Lock Aspect box to keep the proper width. Make sure you release compound path and un- group your score lines first. Then once you have played around a bit to just miss those cut lines you can weld the corn stalks to the edges of your trim pieces. Make a duplicate of your cornstalks before you do this. I have learned that when I don't make a duplicate I am always sorry. If you find you don't need it you can always delete it when your card is completed. Regroup your cut lines to the corn trim and cut as usual.
If you do not shorten the length of the trim it will be to long for the card. I will list the colors of card stock I used at the bottom of this post. I used my Forest Branches Cuttlebug embossing folder to add texture to the corn stalks and inked them with Tim Holtz Rusty Hinges and Gathered Twigs ink. Slightly curl the stalks with a pen or a wooden dowel.
Note: I did have to move two of the cut lines just slightly to keep from cutting into my corn stalk.
To cover the fringe on the top of the card I drew a rectangle W 4.502 x 1.086 H. I ungrouped and released compound path on black 1. Holding down the shift key select each cut line and group them. Then duplicate the cut lines and place in the same place on your rectangle as on the card base. Group those to your rectangle and move aside. Regroup all the cut lines, score lines and cut outs. Sometimes getting the compound path back can be difficult so just regrouping will give you back all the cuts without the headaches.
I cut my card base using Truffle Bazzill card stock and used Echo Park The Story of Fall Collection to make my card. When I find a collection I really like I try to buy the 6x6 pad and the 12 x 12 collection. The smaller scale of the 6x6 pad works great for cards and if you need a smaller pattern for an area on your 3D project you will be thrilled you have it. I used the edge of one of the papers to add the flowers to the top trim.( the rectangle you made with the cut lines) I assembled the card body then cut my pumpkins out.
The pumpkins were cut using American Craft Carrot card stock. I darkened the faces first with Tim Holtz Spiced Marmalade, then darkened the lines of the pumpkins with my Stampin' write Dusty Durango marker. I also added a few extra lines around the mouth and eyebrow's on some. I cut the white, using Sunflower AC card stock because I wanted them to look like they were glowing, then decided I wanted to darken it as well using a Crushed Curry Stampin write pen. I added black pearls from Michaels for the eyes. The pumpkins were adhered to their spots and the glowing affect was enhanced with a clear Zig Wink of Stella pen.
The Stars on the card also benefited from the Crushed Curry Stampin' write pen and the Zig Wink of Stella pen. I added a couple of enamel dots from Echo Parks The Story of Fall Collection. The panels_black were cut from Truffle Bazzill card stock and embossed with Echo Park Falling Leaves embossing folder. I added Cappuccino twine bows, from The Twinery to the edges of the pennants on the sides like Mary did on her card.
That was how I made this card. I like the way it turned out so I will be making another and sending to my mom and dad as well. All in all this is a wonderful new kit from Mary who is very talented, but you don't have to take my word for it. Just click on the links below and you will see for yourself the wonderful kits and collections that are available. Thank you so much for reading my blog and for understanding my absence. I am sure I will have many stories about Opie as we have not had a kitten for 7 yrs. Have a wonderful day and Happy Craftin' Y'all! Blessings Sharalyn
Stay tuned I will be making the Barn in a non scary form as well. So much to play with in this wonderful kit! A special note of thanks to Katie Smiley for "missing me" it touched my heart greatly. Thank you Katie! I missed you all as well.
SVG Kits Used:
Barn Party SVG Kit
Supplies Used:
Echo Park The Story of Fall Collection: 6x6 pad
Echo Park The Story of Fall: Enamel Dots
Echo Park The Story of Fall Collection: Falling Leaves Emboss Folder
Bazzill Card Stock: Truffle, Pollen
American Craft Card Stock: Sunflower, Carrot
The Twinery: Cappuccino Twine
Cuttlebug: Forest Branches Embossing Folder
Zig: Wink of Stella Clear Pen
Tim Holtz Distress Inks: Gathered Twigs, Spiced Marmalade, Rusty Hinge
Stampin' write: Dusty Durango, Crushed Curry
Recollections: Small Black Pearls
Scotch Quick Dry Adhesive
Silhouette America: Cameo Cutting Machine
I apologize for not posting for so long but my kitty I had of 7 yrs passed away from early feline kidney disease. I was to sad to even think about crafting.
Now we are in the process of adopting a new baby, a boy this time whom my husband has named Opie. We are thrilled to have the pitter patter of little kitty feet again.
When I saw the newest kit, Barn Party SVG Kit, I just knew I wanted to make the card for Mark's mom. We have had an event filled summer. Mark's mom broke her hip and though she has had a partial hip replacement, at 95 she knew she just couldn't live alone anymore. She has moved to a senior assisted living physicality only 5 min. away from my sister in law in San Dimas California. Not having her so close anymore I wanted to make this Halloween card for her. This card is just to cute for words but of course I had to add my own twist to it. I hope you enjoy it. Please read the instructions before you cut anything.
I started with the Barn Party SVG Kit and opened the Haunted Barn svg, where I imported the corn_stalks svg to my virtual mat. Using my knife, I cut off the bottom portion of the corn stalks. I sized the cut corn stalks to W 4.910 x 1.397 H. Resize your trim pieces by reducing the height a bit. I took off 0.125 from the height. Use your calculator to figure out what you need to enter in the height measurement. The orange trim was sized to W 4.500 x 1.056 H. Now you do the purple trim using this method. You will need to uncheck the Lock Aspect box to keep the proper width. Make sure you release compound path and un- group your score lines first. Then once you have played around a bit to just miss those cut lines you can weld the corn stalks to the edges of your trim pieces. Make a duplicate of your cornstalks before you do this. I have learned that when I don't make a duplicate I am always sorry. If you find you don't need it you can always delete it when your card is completed. Regroup your cut lines to the corn trim and cut as usual.
If you do not shorten the length of the trim it will be to long for the card. I will list the colors of card stock I used at the bottom of this post. I used my Forest Branches Cuttlebug embossing folder to add texture to the corn stalks and inked them with Tim Holtz Rusty Hinges and Gathered Twigs ink. Slightly curl the stalks with a pen or a wooden dowel.
Note: I did have to move two of the cut lines just slightly to keep from cutting into my corn stalk.
To cover the fringe on the top of the card I drew a rectangle W 4.502 x 1.086 H. I ungrouped and released compound path on black 1. Holding down the shift key select each cut line and group them. Then duplicate the cut lines and place in the same place on your rectangle as on the card base. Group those to your rectangle and move aside. Regroup all the cut lines, score lines and cut outs. Sometimes getting the compound path back can be difficult so just regrouping will give you back all the cuts without the headaches.
I cut my card base using Truffle Bazzill card stock and used Echo Park The Story of Fall Collection to make my card. When I find a collection I really like I try to buy the 6x6 pad and the 12 x 12 collection. The smaller scale of the 6x6 pad works great for cards and if you need a smaller pattern for an area on your 3D project you will be thrilled you have it. I used the edge of one of the papers to add the flowers to the top trim.( the rectangle you made with the cut lines) I assembled the card body then cut my pumpkins out.
The pumpkins were cut using American Craft Carrot card stock. I darkened the faces first with Tim Holtz Spiced Marmalade, then darkened the lines of the pumpkins with my Stampin' write Dusty Durango marker. I also added a few extra lines around the mouth and eyebrow's on some. I cut the white, using Sunflower AC card stock because I wanted them to look like they were glowing, then decided I wanted to darken it as well using a Crushed Curry Stampin write pen. I added black pearls from Michaels for the eyes. The pumpkins were adhered to their spots and the glowing affect was enhanced with a clear Zig Wink of Stella pen.
The Stars on the card also benefited from the Crushed Curry Stampin' write pen and the Zig Wink of Stella pen. I added a couple of enamel dots from Echo Parks The Story of Fall Collection. The panels_black were cut from Truffle Bazzill card stock and embossed with Echo Park Falling Leaves embossing folder. I added Cappuccino twine bows, from The Twinery to the edges of the pennants on the sides like Mary did on her card.
That was how I made this card. I like the way it turned out so I will be making another and sending to my mom and dad as well. All in all this is a wonderful new kit from Mary who is very talented, but you don't have to take my word for it. Just click on the links below and you will see for yourself the wonderful kits and collections that are available. Thank you so much for reading my blog and for understanding my absence. I am sure I will have many stories about Opie as we have not had a kitten for 7 yrs. Have a wonderful day and Happy Craftin' Y'all! Blessings Sharalyn
Stay tuned I will be making the Barn in a non scary form as well. So much to play with in this wonderful kit! A special note of thanks to Katie Smiley for "missing me" it touched my heart greatly. Thank you Katie! I missed you all as well.
SVG Kits Used:
Barn Party SVG Kit
Supplies Used:
Echo Park The Story of Fall Collection: 6x6 pad
Echo Park The Story of Fall: Enamel Dots
Echo Park The Story of Fall Collection: Falling Leaves Emboss Folder
Bazzill Card Stock: Truffle, Pollen
American Craft Card Stock: Sunflower, Carrot
The Twinery: Cappuccino Twine
Cuttlebug: Forest Branches Embossing Folder
Zig: Wink of Stella Clear Pen
Tim Holtz Distress Inks: Gathered Twigs, Spiced Marmalade, Rusty Hinge
Stampin' write: Dusty Durango, Crushed Curry
Recollections: Small Black Pearls
Scotch Quick Dry Adhesive
Silhouette America: Cameo Cutting Machine
Tuesday, September 1, 2015
Scarecrow Mason Jar Topper
Hey Y'all,
I had a new friend coming over to see my space and decided to change all my decorations on my shelf to fall. I had Easter through July on them. As I put my fall decor up, I moved Christmas decor into two boxes. This would make it easier to find and change to Christmas decor when the time came. One of the things I came across the snowman topper for a mason jar. I thought, I should make one as a scarecrow and wondered, why didn't I do that last year? As I tried to make one I realized why I hadn't done that last year. I didn't make one because the head for the snowman had ten pieces and the two hats I thought would work had eight and six pieces. I went to work and made one using ten pieces but it didn't look right and I wasn't sure why? As I sat thinking about it I took the hat off a small unfinished pumpkin from last year and put in on the head. That was it! The hat was to small for the head. It would take some filling in the gaps underneath with raffia but it would be perfectly. That is how this cute little guy came about and he makes me smile every time I look at him.
Cut the hat.svg from Haunted Forest SVG Kit at W 7.529 x 5.603 H. Cut the hat_panels.svg at W. 6.142 x 3.022 H. Assemble the hat then using a small flower punch, cut "bites" out of the brim. Use a distress tool (rough nail buffer or a real distress tool) to give the hat a look of wear to it. I used Cuttlebug Tiny Mosaic emboss folder on the panels for texture. You can do the emboss straight or turn your pieces so that the mosaic comes out triangles. Ink the hat and panel pieces with Tim Holtz rusty hinge then use gathered twigs. I ink my panels before I put them on to ink the edges of each panel piece, this brings out more detail. Glue your hat_panels.svgs to the hat. Squeeze the top of the hat together and using scissors cut the top off, squeeze the hat the other way and cut off just the tips sticking up. Distress the top and ink with Tim Holtz gathered twigs,set aside to dry.
From Santa's Sweets SVG Kit cut the white. svg from Mason Jar Snowman file. Cut at the size it imports, the size is W8.000 x 4.829 H. I used American Craft Card Stock color, Latte. Glue the head together and cut the nose.svg from Leaves Are Falling SVG Kit. I cut three and glued one on top of the other for dimension. The size for those are as they import which is W 0.400 x 0.542 H. I used a dark brown pen to add the x's around the nose. Line the bottom of the nose up with the cut out and glue just over your cut out. Using a pencil decide where you want your eyes and add eye lashes. Do the same for your mouth. Draw your mouth on with the pencil as well. You can fill it in with a brown pen after your sure it is the way you would like it to look. I used Pearlescent Chalk to add my "cheeks". I used large Black Enamel dots for the eyes.
NOTE: Try the hat on your snowman so you can see how far down the hat goes. I glued the hat on first then put the eyes and nose on and it made it difficult to get the eye lashes in the right place.
Glue the hat into place pushing the head tabs to the inside of the hat. It will not match perfectly so don't try. You will be filling the gabs in with raffia hot glued into place. Don't worry about getting the raffia a certain length before you glue as you could burn your fingers with shorter pieces. You can give your scarecrow a haircut after the glue has cooled.
Fill your eyelashes and mouth in once you have adhered the eyes. Hot glue the ribbon for the hat into place cutting a tiny notches around the bottom for a better fit. These were cut to fit at the "seams" of the hat. I added a few pieces of raffia to the top inside using hot glue.
The sunflower is from 3D Mums and Fall Flowers SVG Kit. Cut the petals.svg at W 4.092 x 1.874 H. Cut the centers.svg at W.4.311 x 1.938 H. I used mustard colored American Craft Card Stock to cut the petals and inked the flower with Stampin Up Rich Razzleberry. The centers were cut using Coffee American Craft Card stock. The center of the sunflower is one of the small circles from the center cuts for you sunflower. Emboss it with Cuttlebug Tiny Bubbles Emboss folder then ink with Brilliance Copper ink. The sunflower is shaped with Mc Gill Flower Shaping tools. Bend your flower in half a bit then Hot glue into place. The wheat is from Our Thanksgiving Gathering SVG Collection and is cut at W 0.500 x 1.74 H. The oak leaf is from Autumn Elements SVG Collection, I can only give you an about size on that one but if you size the leaf to about an 1.25 long you should be able to get the size I used. Make sure when you do that your lock aspect is checked. The crow is a sticker embellishment I picked up from Michaels a few yrs ago, I would love to find some more. The tiny themed flats are from buttonsgaloreandmore.com Those were my last two and I will need to place another order from them soon. I just love their buttons!
You can use a ribbon or as I did cut a strip of fabric using pinking sheers and tie around the neck of the scarecrow head once you have place it on a sealed Maison Jar. I have filled mine with Candy Corn but you could fill it with anything. Pinterest has great ideas on what you can put in a Maison Jar as a gift. Take it to your Fall dinner parties or as a thank you gift for someone special. What ever you put inside I am sure it will be wonderful and they will have a cute scarecrow as well.
Thanks so much for stopping by and reading my blog. Your encouragements are much appreciated. If you make one of these cuties I would love to see it. You could post a picture on SVG Cuts or on my Facebook page Shara's Paper Creations. I love seeing other peoples ideas and hey, isn't that what crafting is all about? Thanks again, have a wonderful day and Happy Craftin' Y'all!
Blessings, Sharalyn
SVG Kits and Collections Used:
Haunted Forest SVG Kit
Santa's Sweets SVG Kit
Leaves Are Falling SVG Kit
3D Mums and Fall Flowers SVG Kit
Our Thanksgiving Gathering SVG Collection
Autumn Elements SVG Collection
Supplies Used:
American Craft Card Stock: Mustard, Latte, Apricot, pomegranate, oregano
Tim Holtz Distress Inks: rusty hinge, Gathered twigs
Ranger Enamel Accents: White (dot on eyes)
Pebbles Pearlescent Chalks
Cuttlebug Emboss Folders: Tiny Bubbles, Tiny Mosaics
Black Enamel Dots
Buttons Galore and More: Flat Buttons
Fine Brown Marker
Stampin Up: Jean Ribbon (discontinued but sure you can find it on ebay)
Fabric Scrap
I had a new friend coming over to see my space and decided to change all my decorations on my shelf to fall. I had Easter through July on them. As I put my fall decor up, I moved Christmas decor into two boxes. This would make it easier to find and change to Christmas decor when the time came. One of the things I came across the snowman topper for a mason jar. I thought, I should make one as a scarecrow and wondered, why didn't I do that last year? As I tried to make one I realized why I hadn't done that last year. I didn't make one because the head for the snowman had ten pieces and the two hats I thought would work had eight and six pieces. I went to work and made one using ten pieces but it didn't look right and I wasn't sure why? As I sat thinking about it I took the hat off a small unfinished pumpkin from last year and put in on the head. That was it! The hat was to small for the head. It would take some filling in the gaps underneath with raffia but it would be perfectly. That is how this cute little guy came about and he makes me smile every time I look at him.
Cut the hat.svg from Haunted Forest SVG Kit at W 7.529 x 5.603 H. Cut the hat_panels.svg at W. 6.142 x 3.022 H. Assemble the hat then using a small flower punch, cut "bites" out of the brim. Use a distress tool (rough nail buffer or a real distress tool) to give the hat a look of wear to it. I used Cuttlebug Tiny Mosaic emboss folder on the panels for texture. You can do the emboss straight or turn your pieces so that the mosaic comes out triangles. Ink the hat and panel pieces with Tim Holtz rusty hinge then use gathered twigs. I ink my panels before I put them on to ink the edges of each panel piece, this brings out more detail. Glue your hat_panels.svgs to the hat. Squeeze the top of the hat together and using scissors cut the top off, squeeze the hat the other way and cut off just the tips sticking up. Distress the top and ink with Tim Holtz gathered twigs,set aside to dry.
From Santa's Sweets SVG Kit cut the white. svg from Mason Jar Snowman file. Cut at the size it imports, the size is W8.000 x 4.829 H. I used American Craft Card Stock color, Latte. Glue the head together and cut the nose.svg from Leaves Are Falling SVG Kit. I cut three and glued one on top of the other for dimension. The size for those are as they import which is W 0.400 x 0.542 H. I used a dark brown pen to add the x's around the nose. Line the bottom of the nose up with the cut out and glue just over your cut out. Using a pencil decide where you want your eyes and add eye lashes. Do the same for your mouth. Draw your mouth on with the pencil as well. You can fill it in with a brown pen after your sure it is the way you would like it to look. I used Pearlescent Chalk to add my "cheeks". I used large Black Enamel dots for the eyes.
NOTE: Try the hat on your snowman so you can see how far down the hat goes. I glued the hat on first then put the eyes and nose on and it made it difficult to get the eye lashes in the right place.
Glue the hat into place pushing the head tabs to the inside of the hat. It will not match perfectly so don't try. You will be filling the gabs in with raffia hot glued into place. Don't worry about getting the raffia a certain length before you glue as you could burn your fingers with shorter pieces. You can give your scarecrow a haircut after the glue has cooled.
Fill your eyelashes and mouth in once you have adhered the eyes. Hot glue the ribbon for the hat into place cutting a tiny notches around the bottom for a better fit. These were cut to fit at the "seams" of the hat. I added a few pieces of raffia to the top inside using hot glue.
The sunflower is from 3D Mums and Fall Flowers SVG Kit. Cut the petals.svg at W 4.092 x 1.874 H. Cut the centers.svg at W.4.311 x 1.938 H. I used mustard colored American Craft Card Stock to cut the petals and inked the flower with Stampin Up Rich Razzleberry. The centers were cut using Coffee American Craft Card stock. The center of the sunflower is one of the small circles from the center cuts for you sunflower. Emboss it with Cuttlebug Tiny Bubbles Emboss folder then ink with Brilliance Copper ink. The sunflower is shaped with Mc Gill Flower Shaping tools. Bend your flower in half a bit then Hot glue into place. The wheat is from Our Thanksgiving Gathering SVG Collection and is cut at W 0.500 x 1.74 H. The oak leaf is from Autumn Elements SVG Collection, I can only give you an about size on that one but if you size the leaf to about an 1.25 long you should be able to get the size I used. Make sure when you do that your lock aspect is checked. The crow is a sticker embellishment I picked up from Michaels a few yrs ago, I would love to find some more. The tiny themed flats are from buttonsgaloreandmore.com Those were my last two and I will need to place another order from them soon. I just love their buttons!
You can use a ribbon or as I did cut a strip of fabric using pinking sheers and tie around the neck of the scarecrow head once you have place it on a sealed Maison Jar. I have filled mine with Candy Corn but you could fill it with anything. Pinterest has great ideas on what you can put in a Maison Jar as a gift. Take it to your Fall dinner parties or as a thank you gift for someone special. What ever you put inside I am sure it will be wonderful and they will have a cute scarecrow as well.
Thanks so much for stopping by and reading my blog. Your encouragements are much appreciated. If you make one of these cuties I would love to see it. You could post a picture on SVG Cuts or on my Facebook page Shara's Paper Creations. I love seeing other peoples ideas and hey, isn't that what crafting is all about? Thanks again, have a wonderful day and Happy Craftin' Y'all!
Blessings, Sharalyn
SVG Kits and Collections Used:
Haunted Forest SVG Kit
Santa's Sweets SVG Kit
Leaves Are Falling SVG Kit
3D Mums and Fall Flowers SVG Kit
Our Thanksgiving Gathering SVG Collection
Autumn Elements SVG Collection
Supplies Used:
American Craft Card Stock: Mustard, Latte, Apricot, pomegranate, oregano
Tim Holtz Distress Inks: rusty hinge, Gathered twigs
Ranger Enamel Accents: White (dot on eyes)
Pebbles Pearlescent Chalks
Cuttlebug Emboss Folders: Tiny Bubbles, Tiny Mosaics
Black Enamel Dots
Buttons Galore and More: Flat Buttons
Fine Brown Marker
Stampin Up: Jean Ribbon (discontinued but sure you can find it on ebay)
Fabric Scrap
Thursday, August 20, 2015
A Change of Seasons
Hey y'all,
Every year about this time I get into a, I can't stand this heat anymore please someone give me some fall mood! I have hit that point again and since this is my very favorite time of year I get a little crazy making just about anything in a fall theme. Spring Blossoms SVG Kit was my victim this time, I do hope you like it.
Start with the lantern from the Spring Blossoms SVG Kit and cut the lantern out. I used Bazzill Cinnamon Stick for the base and then cut the panels_bottom, panels_top and panels_middle out of Bazzill Truffle. I like the grass textured paper and so does my machine but this time it really worked in my favor to have that texture. I used my Hero Arts wood-grain background stamp to make the wood look on the paper. I used a darker ink for the wood-grain which was Tim Holtz gathered twigs, then I used Tim Holtz rusty hinge all over the top of the wood-grain. That really made it look like wood and I was a bit surprised at how much it looked like wood. To make the window cuts stand out I inked just the window portion of the lantern with gathered twigs. After it dried I added my vellum to the inside of the lantern. The panels were inked and embossed with Tim Holtz Birch Trees emboss folder and Tim Holtz gathered twigs ink.
The vellum was made for another project but I wasn't happy with the way the project looked so it was set aside for another project. I made the vellum using Tim Holtz inks and my Basic Grey Finery stamp set. This was one of the first stamp sets I bought and I still used it 5 yrs later. The leaves of the stamp set are smooth and work quite well to add ink to portions of the stamp before stamping.The colors I used to stamp the vellum were mustard seed, fired brick and spiced marmalade. Using the Stampin Up leaf stamp from the Autumn Harvest Stamp set and Tim Holtz fired brick, Gold Brilliance ink, I stamped the single leaf for a bit more interest. To achieve the yellowed look I inked the back of the vellum all over with Tim Holtz scattered straw ink pad. Let that dry and then apply the leaf side to the mat. I did it that way because the leaves had more time to dry and I wouldn't get ink all over my mat, cut your vellum pieces.
Note: Let each side dry thoroughly before inking the next side.
Assemble your lantern as per Mary's instructions. Using Bazzill Mud Pie card stock cut the branches from the Cherry Blossoms and Branch SVG Freebie. Cut the Branch at W 2.454 x 1.864 H. I cut several as I wasn't sure how many I would use. I used Tim Holtz Birch Trees emboss folder to emboss the branches as wanted them to have some texture as well. I used my McGill Flower shaping tools to bend and curve the branches. ( you could also use a thin paint brush handle) I glued the oak leaves from Autumn Elements SVG Collection cut at W 0.456 x 0.507 H to the branches. I cut about 40 of each color as I knew they would not all come off the mat cleanly. The colors I used are American Craft pomegranate, Apricot, Sunflower. Using Scotch Quick dry adhesive and tweezers I glued each leaf into place after shaping them a bit. The tweezers were used to hold the leaves into place until the glue adhered. Use your artistic eye and think about trees you have seen that are loosing their leaves to decide where to put leaves. Add your light and make a tag or special card to go with it if you decide to give it as a gift. This is for my beautiful daughter whom loves fall as much as I do. She also appreciates all the things I make.
That is my lantern from the Spring Blossoms SVG Kit and I hope you like it. Experimenting can lead to a good thing but how will you know unless you try? I tried and my lantern looked amazingly like wood to me. Go for it! Experiment with your crafting! Thank you so much for stopping by and reading my blog, much love and blessings to you all and Happy Craftin' Y'all! Blessings, Sharalyn
SVG Kits and Collections Used:
Spring Blossoms SVG Kit
Autumn Elements SVG Collection
Cherry Blossoms and Branch SVG Freebie.
Supplies Used:
Bazzill Card Stock: Cinnamon, Truffle, Mud Pie
American Craft Card Stock: Pomegranate, Apricot, Sunflower
Stampin Up: Card Stock Vellum
Hero Arts: Wood Grain Background Stamp
Stampin Up: Autumn Harvest Stamp Set (retired)
Basic Grey: Finery Stamp Set
Tim Holtz Distress Inks: fired brick, scattered straw, rusty hinge, gathered twigs, spiced marmalade
TSUKINEKO: Archival Brilliance Galaxy Gold Ink
Hot Glue
Scotch Quick Dry Adhesive
Silhouette Cameo
P.S. I am still working on reloading all my photos to my blog, thank you all for your patience.
Every year about this time I get into a, I can't stand this heat anymore please someone give me some fall mood! I have hit that point again and since this is my very favorite time of year I get a little crazy making just about anything in a fall theme. Spring Blossoms SVG Kit was my victim this time, I do hope you like it.
Start with the lantern from the Spring Blossoms SVG Kit and cut the lantern out. I used Bazzill Cinnamon Stick for the base and then cut the panels_bottom, panels_top and panels_middle out of Bazzill Truffle. I like the grass textured paper and so does my machine but this time it really worked in my favor to have that texture. I used my Hero Arts wood-grain background stamp to make the wood look on the paper. I used a darker ink for the wood-grain which was Tim Holtz gathered twigs, then I used Tim Holtz rusty hinge all over the top of the wood-grain. That really made it look like wood and I was a bit surprised at how much it looked like wood. To make the window cuts stand out I inked just the window portion of the lantern with gathered twigs. After it dried I added my vellum to the inside of the lantern. The panels were inked and embossed with Tim Holtz Birch Trees emboss folder and Tim Holtz gathered twigs ink.
The vellum was made for another project but I wasn't happy with the way the project looked so it was set aside for another project. I made the vellum using Tim Holtz inks and my Basic Grey Finery stamp set. This was one of the first stamp sets I bought and I still used it 5 yrs later. The leaves of the stamp set are smooth and work quite well to add ink to portions of the stamp before stamping.The colors I used to stamp the vellum were mustard seed, fired brick and spiced marmalade. Using the Stampin Up leaf stamp from the Autumn Harvest Stamp set and Tim Holtz fired brick, Gold Brilliance ink, I stamped the single leaf for a bit more interest. To achieve the yellowed look I inked the back of the vellum all over with Tim Holtz scattered straw ink pad. Let that dry and then apply the leaf side to the mat. I did it that way because the leaves had more time to dry and I wouldn't get ink all over my mat, cut your vellum pieces.
Note: Let each side dry thoroughly before inking the next side.
Assemble your lantern as per Mary's instructions. Using Bazzill Mud Pie card stock cut the branches from the Cherry Blossoms and Branch SVG Freebie. Cut the Branch at W 2.454 x 1.864 H. I cut several as I wasn't sure how many I would use. I used Tim Holtz Birch Trees emboss folder to emboss the branches as wanted them to have some texture as well. I used my McGill Flower shaping tools to bend and curve the branches. ( you could also use a thin paint brush handle) I glued the oak leaves from Autumn Elements SVG Collection cut at W 0.456 x 0.507 H to the branches. I cut about 40 of each color as I knew they would not all come off the mat cleanly. The colors I used are American Craft pomegranate, Apricot, Sunflower. Using Scotch Quick dry adhesive and tweezers I glued each leaf into place after shaping them a bit. The tweezers were used to hold the leaves into place until the glue adhered. Use your artistic eye and think about trees you have seen that are loosing their leaves to decide where to put leaves. Add your light and make a tag or special card to go with it if you decide to give it as a gift. This is for my beautiful daughter whom loves fall as much as I do. She also appreciates all the things I make.
That is my lantern from the Spring Blossoms SVG Kit and I hope you like it. Experimenting can lead to a good thing but how will you know unless you try? I tried and my lantern looked amazingly like wood to me. Go for it! Experiment with your crafting! Thank you so much for stopping by and reading my blog, much love and blessings to you all and Happy Craftin' Y'all! Blessings, Sharalyn
SVG Kits and Collections Used:
Spring Blossoms SVG Kit
Autumn Elements SVG Collection
Cherry Blossoms and Branch SVG Freebie.
Supplies Used:
Bazzill Card Stock: Cinnamon, Truffle, Mud Pie
American Craft Card Stock: Pomegranate, Apricot, Sunflower
Stampin Up: Card Stock Vellum
Hero Arts: Wood Grain Background Stamp
Stampin Up: Autumn Harvest Stamp Set (retired)
Basic Grey: Finery Stamp Set
Tim Holtz Distress Inks: fired brick, scattered straw, rusty hinge, gathered twigs, spiced marmalade
TSUKINEKO: Archival Brilliance Galaxy Gold Ink
Hot Glue
Scotch Quick Dry Adhesive
Silhouette Cameo
P.S. I am still working on reloading all my photos to my blog, thank you all for your patience.
Monday, July 27, 2015
Minnie Ears for Crystal
Hello y'all!
As I write this my blog has no photos on it and the background is missing but, I am confident God is taking care of it all for me and will help me clear this up. Update: I erased the photos myself while "taking them off my phone", I will get them all back on there as soon as I can. It will take a while *face palm*
I have a dear friend that just moved to Hawaii. She and her sweet husband were in our choir at church. Since he is military they move where the military tells them, so they had to move to Hawaii, every one say awe. Yes we will miss them but we wish them well. Anyhoo, she loves Mickey and Minnie mouse and because I am missing her, this idea popped into my head. I hope you love it.
Start with the baseball cap from Fun and Games SVG Kit. Using the baseball cap file, bring the cap_1 onto your virtual mat. Ungroup and release compound path, then remove the circles Mary used for holes in the cap. Draw a rectangle W0.984 x 3.205 H, you will need to double click this to move the nodes so that there is a curve matching the score line on the cap. This will allow the ears to fit naturally to the cap. Once it is the correct shape click on the cap and holding down the shift key select the rectangle now go to the modify window and select subtract. This will be the cut out for the ears. You will need two of those. Duplicate the cap piece you just made and flip it or mirror it. You can move the extra piece of cap you will not need off to the side. You will need a total of 6 pieces. Be sure to regroup all your score lines to your cap. Select all and group. Now you can move the pieces without your score lines being in the wrong place.
Bring cap_2 onto your virtual mat and un-group and release compound path. Delete the cap with the brim and the extra brim and lines. Duplicate the octagon four times. Glue three together as you would for the bottom of the hat. The fourth I made smaller and used as an insert to cover the tabs on the bottom inside of the box. This is the size used. W 5.636 x 4.881 H.
The ears were made using a circle W 3.477 x 3.477 H. I cut off the bottom of the circle and extended the nodes just a bit on the sides to mimic the Mickey ears. Double click on your circle to activate the node portion. You will know you have done it when you see grayed boxes at various points. Add a node to the center of the flat portion, do this by clicking on the center of your line. Click and drag the node just under 3/4 of the way up. You're making a cut so that the ear curves a bit and the bottom will be your tabs to adhere to the inside of the cap. I added score lines on either side of the tabs across the sides. Make a duplicate of this ear and flip it, then cut two of each. Glue two sides of your ears facing each other, be sure not to glue your flaps together. Assemble the cap top and slide each ear into the slots you made. Glue the tabs onto the inside of the cap
The two side pieces of the cap with the slits for the ears should be towards the front not the back.
NOTE: It would be helpful to number your cap pieces as I got confused twice.
Assemble the bottom of the cap as Mary instructs, you will just not have the bill or sun visor portion of the cap.
I made the free 3d Bow for Minnie's Cap. It was sized at W. 4.683 x 10.634 H . I did cut the ribbon portion of the bow down a bit with scissors but that it optional. I just felt the size was right but the ties were a bit to long. Cut and extra center if you wish and curve it a bit with a dowel or pencil. Make a loop and adhere to the top of the center bow.
You can now fill your Mickey or Minnie ears with whatever you like, or add a name to the back as if it was from Disneyland by using vinyl, or simply use a gold pen and using dash lines write the persons name. Have fun with it. I could imagine as I made this bear, bunny, dog or even antlers for Christmas! Just be add a large red pom to the center front for the reindeer. Have fun with it that is the whole purpose and most of all give it away. The joy in making fun things like this is giving it away and seeing your recipients face.
Thank you for stopping by and reading my blog, prayerfully it will be fixed soon. Hugs to all of you and thank you so much for continuing to encourage me. Thanks again so very much and Happy Craftin' Y'all! Blessings Sharalyn
SVG Kits Used:
Fun and Games SVG Kit
Free 3-d bow
Supplies Used:
American Crafts Card Stock: Black
Stampin Up Designer Paper- retired
Scotch Quick Dry Adhesive
Silhouette Cameo
As I write this my blog has no photos on it and the background is missing but, I am confident God is taking care of it all for me and will help me clear this up. Update: I erased the photos myself while "taking them off my phone", I will get them all back on there as soon as I can. It will take a while *face palm*
I have a dear friend that just moved to Hawaii. She and her sweet husband were in our choir at church. Since he is military they move where the military tells them, so they had to move to Hawaii, every one say awe. Yes we will miss them but we wish them well. Anyhoo, she loves Mickey and Minnie mouse and because I am missing her, this idea popped into my head. I hope you love it.
Start with the baseball cap from Fun and Games SVG Kit. Using the baseball cap file, bring the cap_1 onto your virtual mat. Ungroup and release compound path, then remove the circles Mary used for holes in the cap. Draw a rectangle W0.984 x 3.205 H, you will need to double click this to move the nodes so that there is a curve matching the score line on the cap. This will allow the ears to fit naturally to the cap. Once it is the correct shape click on the cap and holding down the shift key select the rectangle now go to the modify window and select subtract. This will be the cut out for the ears. You will need two of those. Duplicate the cap piece you just made and flip it or mirror it. You can move the extra piece of cap you will not need off to the side. You will need a total of 6 pieces. Be sure to regroup all your score lines to your cap. Select all and group. Now you can move the pieces without your score lines being in the wrong place.
Bring cap_2 onto your virtual mat and un-group and release compound path. Delete the cap with the brim and the extra brim and lines. Duplicate the octagon four times. Glue three together as you would for the bottom of the hat. The fourth I made smaller and used as an insert to cover the tabs on the bottom inside of the box. This is the size used. W 5.636 x 4.881 H.
The ears were made using a circle W 3.477 x 3.477 H. I cut off the bottom of the circle and extended the nodes just a bit on the sides to mimic the Mickey ears. Double click on your circle to activate the node portion. You will know you have done it when you see grayed boxes at various points. Add a node to the center of the flat portion, do this by clicking on the center of your line. Click and drag the node just under 3/4 of the way up. You're making a cut so that the ear curves a bit and the bottom will be your tabs to adhere to the inside of the cap. I added score lines on either side of the tabs across the sides. Make a duplicate of this ear and flip it, then cut two of each. Glue two sides of your ears facing each other, be sure not to glue your flaps together. Assemble the cap top and slide each ear into the slots you made. Glue the tabs onto the inside of the cap
The two side pieces of the cap with the slits for the ears should be towards the front not the back.
NOTE: It would be helpful to number your cap pieces as I got confused twice.
Assemble the bottom of the cap as Mary instructs, you will just not have the bill or sun visor portion of the cap.
I made the free 3d Bow for Minnie's Cap. It was sized at W. 4.683 x 10.634 H . I did cut the ribbon portion of the bow down a bit with scissors but that it optional. I just felt the size was right but the ties were a bit to long. Cut and extra center if you wish and curve it a bit with a dowel or pencil. Make a loop and adhere to the top of the center bow.
You can now fill your Mickey or Minnie ears with whatever you like, or add a name to the back as if it was from Disneyland by using vinyl, or simply use a gold pen and using dash lines write the persons name. Have fun with it. I could imagine as I made this bear, bunny, dog or even antlers for Christmas! Just be add a large red pom to the center front for the reindeer. Have fun with it that is the whole purpose and most of all give it away. The joy in making fun things like this is giving it away and seeing your recipients face.
Thank you for stopping by and reading my blog, prayerfully it will be fixed soon. Hugs to all of you and thank you so much for continuing to encourage me. Thanks again so very much and Happy Craftin' Y'all! Blessings Sharalyn
SVG Kits Used:
Fun and Games SVG Kit
Free 3-d bow
Supplies Used:
American Crafts Card Stock: Black
Stampin Up Designer Paper- retired
Scotch Quick Dry Adhesive
Silhouette Cameo
Tuesday, June 16, 2015
Fire Crackers in a Box!
Hi everyone!!!
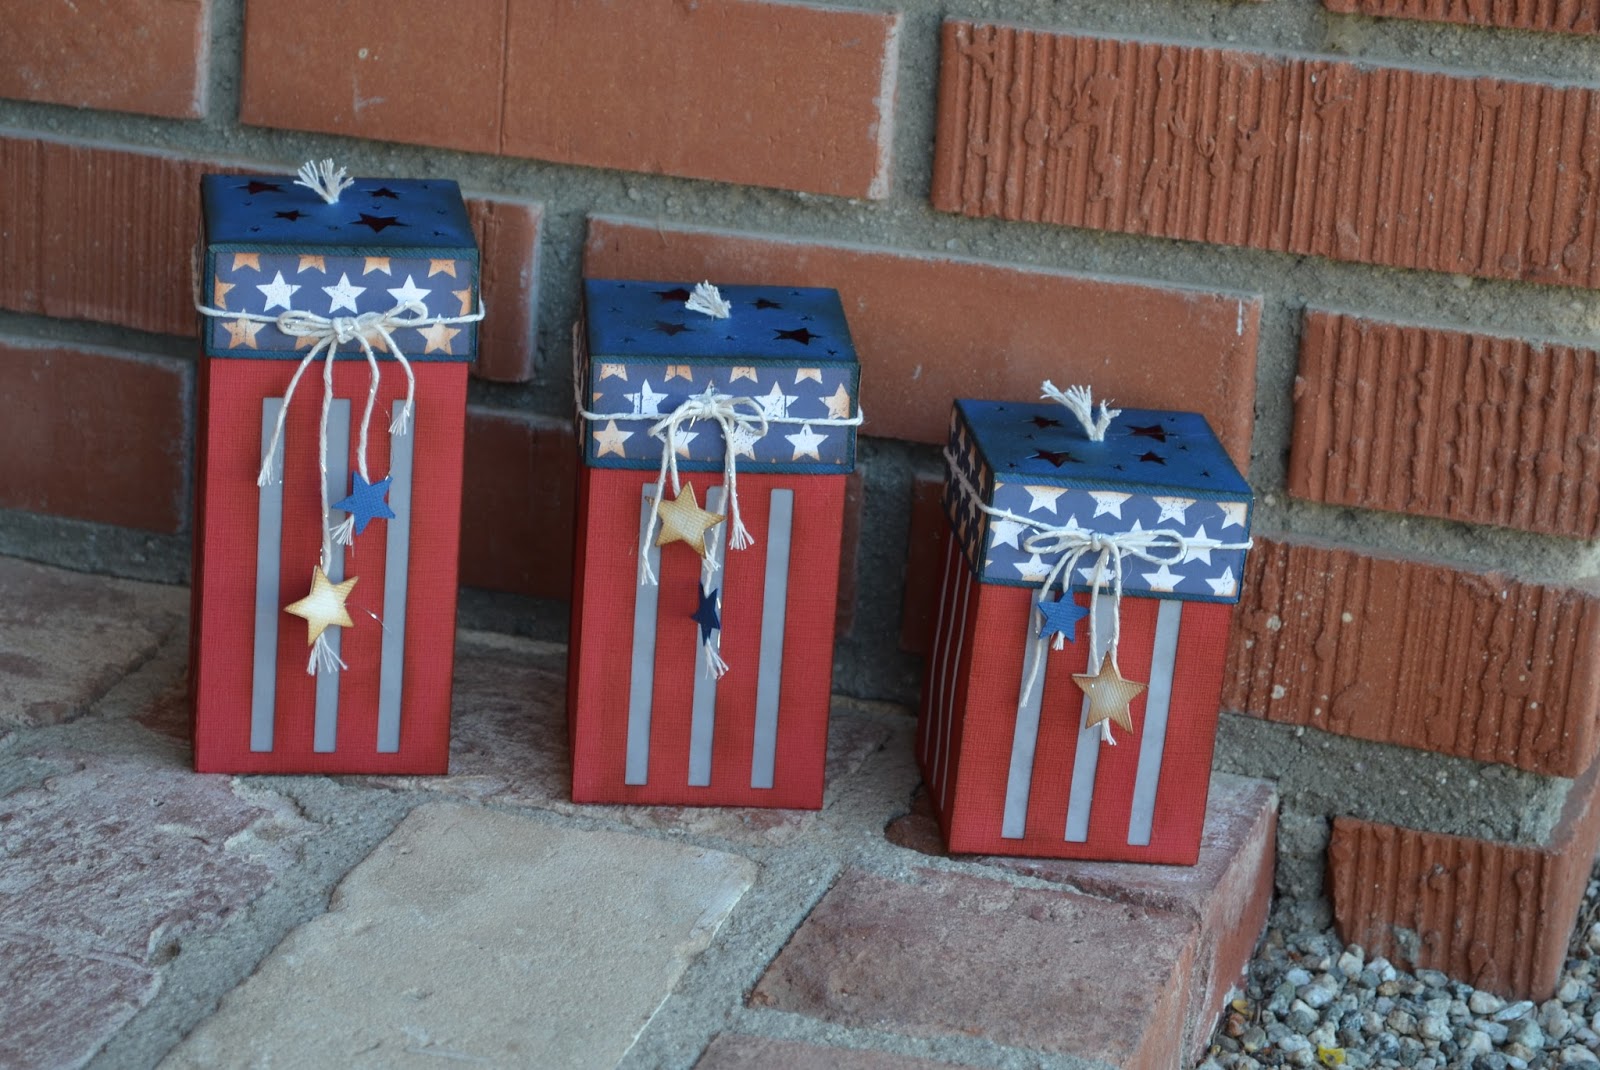
I just love the 4th of July! All the red, white and blue, in the stores is so festive! I start thinking about the 4th of July around Memorial Day, as that is around the time of my sons birth. Mark's mom was born on the 4th of July. I love the country vintage look some of it has as well. The firecrackers I made are in that theme and I hope you enjoy them. I will share the other ideas I had for this at the bottom of this post.
I wanted my firecrackers to look at bit like the painted 4x4's that we often see about this time of year, so I started with the tall gift box from Gift Boxes SVG Kit . The first design is made using the box at the size it imports. I put sides1 on my virtual mat and made three long rectangles sized at W 0.379 x 6.406 H. To made sure they are placed properly, I made a small rectangle to fit the lid side outline then place this on the top of the sides1. This let me know how far down to place the stripes so the lid would not cover them. Draw a rectangle to fit just below the lid rectangle and then place your stripes inside larger rectangle. You can center them inside this larger rectangle and then remove your larger rectangle once they are centered. Click on your side1 and un-group. Click on the un-grouped side1 and holding down our shift key select each "stripes". Go to the modify window and select subtract. Now you have your stripes. You will need to cut two of these sides1 out. I put vellum inside mine and you can do that as well by making the rectangle you used to center your stripes slightly smaller. Make sure you leave enough room to glue the flap to the inside. It has been my experience that the glue does not like to adhere to the vellum well, as a result I try to make the vellum slightly skinner on that side.
Now to make the trio of firecrackers you will only need to shrink them to the different sizes. I did notice that the smallest firecracker lid had covered the stripes at the top but it wasn't that much and it could be adjusted using the same method I used above. Here are the sizes for those firecracker sizes. The lid sizes were not saved but if you simply duplicate one for each firecracker and select all when you adjust each firecracker you should be good to go. The stars for the lids were added by using the stars from Stars and Stripes SVG Kit and were resized and rotated until I liked what I saw. You can either modify and subtract as you did above or simply arrange them. If you intend to move your lid at anytime make sure you group them.
Tall box side W 6.002 x 6.600 H Vellum size for inside: Tall: W.2.141 x 5.815 H
Med box side W 6.002 x 5.622 H Medium: W 2.353 x 4.705 H
Small box side W 6.002 4.643 H Small: W 2.150 x 3.380 H
The Last one I designed was so I could use the battery operated single candle I found at Dollar Tree. Cut side1 is W 6.002 x 8.634 H, remember to cut two. I also designed accent pieces for the top of the lid sides, the size for those are: W 2.772 x 1.083 H. You can make accent pieces for the sides of the box were the stripes are as well by using your knife tool and cutting off the flaps then side them to W 2.568 x 5.810 H. I used overhead sheets to make the windows for this firecracker.
On all of them I used twine for the wick using hot glue to hold it into place. The stars on the twine is an extra piece of twine with stars glued back to back onto the twine. Decorate the rest with embellishment pieces you have in your stash. All firecrackers were inked with Tim Holtz gathered twigs distress ink.
This is an easy and fast project to make. My thought was you could do Happy one one side cut out vertically and then Birthday done the same on another side. You could add the bow that comes with this file, to the top and a cute birthday tag. This could be done with Merry Christmas or Happy Chanukah or anything else you could think of. Add your vellum to the inside and they will only get a peek at the gift inside.
Those are my firecrackers and I hope you like the idea. Your most welcome to post photos on my Shara's Paper Creations Facebook page if you do make one. I would love to see what wonderful ideas you came up with. Thanks yo so much for stopping by and reading my blog. Have a wonderful day and Happy Craftin' Ya'll!
Blessings,Sharalyn
SVG Kits Used:
Gift Boxes SVG Kit
Stars and Stripes SVG Kit
Supplies Used:
Bazzill Card Stock: Maraschino, Artic
Ruby Slipplers
American Craft Card Stock: Vanilla
My Little Yellow Bicycle, Vintage Summer Collection
Maya Road Twine
Stampin Up Card Stock Vellum
Scotch Quick Dry Adhesive
Buttons and Wire Ribbon from Stash
Battery Operated Candle: Dollar Tree
I just love the 4th of July! All the red, white and blue, in the stores is so festive! I start thinking about the 4th of July around Memorial Day, as that is around the time of my sons birth. Mark's mom was born on the 4th of July. I love the country vintage look some of it has as well. The firecrackers I made are in that theme and I hope you enjoy them. I will share the other ideas I had for this at the bottom of this post.
I wanted my firecrackers to look at bit like the painted 4x4's that we often see about this time of year, so I started with the tall gift box from Gift Boxes SVG Kit . The first design is made using the box at the size it imports. I put sides1 on my virtual mat and made three long rectangles sized at W 0.379 x 6.406 H. To made sure they are placed properly, I made a small rectangle to fit the lid side outline then place this on the top of the sides1. This let me know how far down to place the stripes so the lid would not cover them. Draw a rectangle to fit just below the lid rectangle and then place your stripes inside larger rectangle. You can center them inside this larger rectangle and then remove your larger rectangle once they are centered. Click on your side1 and un-group. Click on the un-grouped side1 and holding down our shift key select each "stripes". Go to the modify window and select subtract. Now you have your stripes. You will need to cut two of these sides1 out. I put vellum inside mine and you can do that as well by making the rectangle you used to center your stripes slightly smaller. Make sure you leave enough room to glue the flap to the inside. It has been my experience that the glue does not like to adhere to the vellum well, as a result I try to make the vellum slightly skinner on that side.
Now to make the trio of firecrackers you will only need to shrink them to the different sizes. I did notice that the smallest firecracker lid had covered the stripes at the top but it wasn't that much and it could be adjusted using the same method I used above. Here are the sizes for those firecracker sizes. The lid sizes were not saved but if you simply duplicate one for each firecracker and select all when you adjust each firecracker you should be good to go. The stars for the lids were added by using the stars from Stars and Stripes SVG Kit and were resized and rotated until I liked what I saw. You can either modify and subtract as you did above or simply arrange them. If you intend to move your lid at anytime make sure you group them.
Tall box side W 6.002 x 6.600 H Vellum size for inside: Tall: W.2.141 x 5.815 HMed box side W 6.002 x 5.622 H Medium: W 2.353 x 4.705 H
Small box side W 6.002 4.643 H Small: W 2.150 x 3.380 H
The Last one I designed was so I could use the battery operated single candle I found at Dollar Tree. Cut side1 is W 6.002 x 8.634 H, remember to cut two. I also designed accent pieces for the top of the lid sides, the size for those are: W 2.772 x 1.083 H. You can make accent pieces for the sides of the box were the stripes are as well by using your knife tool and cutting off the flaps then side them to W 2.568 x 5.810 H. I used overhead sheets to make the windows for this firecracker.
On all of them I used twine for the wick using hot glue to hold it into place. The stars on the twine is an extra piece of twine with stars glued back to back onto the twine. Decorate the rest with embellishment pieces you have in your stash. All firecrackers were inked with Tim Holtz gathered twigs distress ink.
This is an easy and fast project to make. My thought was you could do Happy one one side cut out vertically and then Birthday done the same on another side. You could add the bow that comes with this file, to the top and a cute birthday tag. This could be done with Merry Christmas or Happy Chanukah or anything else you could think of. Add your vellum to the inside and they will only get a peek at the gift inside.
Those are my firecrackers and I hope you like the idea. Your most welcome to post photos on my Shara's Paper Creations Facebook page if you do make one. I would love to see what wonderful ideas you came up with. Thanks yo so much for stopping by and reading my blog. Have a wonderful day and Happy Craftin' Ya'll!
Blessings,Sharalyn
SVG Kits Used:
Gift Boxes SVG Kit
Stars and Stripes SVG Kit
Supplies Used:
Bazzill Card Stock: Maraschino, Artic
Ruby Slipplers
American Craft Card Stock: Vanilla
My Little Yellow Bicycle, Vintage Summer Collection
Maya Road Twine
Stampin Up Card Stock Vellum
Scotch Quick Dry Adhesive
Buttons and Wire Ribbon from Stash
Battery Operated Candle: Dollar Tree
Thursday, May 21, 2015
Rustic Glory
Mornin' Y'all!
I have a confession to make, I seriously love Americana! I am drawn to the simple, country, rustic look of it. There is something about making your home feel warm and inviting that appeals to me. I think Americana helps to make your home warm and inviting. I made this door or wall hanger whichever you prefer to call it, to welcome the celebration of our nations birth with a bit of the country feel I love so much. I hope you enjoy this creation.
I started with the crate from Caramel Apple Pie SVG kit. I used crate_face 1 at the size it imports and used the stars_top from Stars and Stripes SVG Kit in the star box file to make the stars in the crate_face 1. I replicated the stars until I had what I liked. You could do a circle or just a few or some large, whatever you like but I ended up with 42 stars measuring W 0.321x 0.313 H. I grouped them together then drew a box just inside the score lines for the top of the box. This helps to center things when your going to do a cut out. Click on your stars holding down the shift key and select your box, then using your align window center your stars. Move the box you drew off to the side and ungroup your score lines from your crate_face 1. You will need to select release compound path first then ungroup. Try not to move anything. Now select your crate_face1 box and holding down the shift key again choose the stars. Now open the modify window and select subtract. Go back and group your score lines to your box without moving things if you can help it. If you should move something click the back arrow at the top under the help menu or undo is another name for it.
I measured the size of the tea light as that was my original thought to use that as my light source. Mine measured about 1.5 inches in width, then I drew a circle that size, using the box I centered the hole in the back side of the crate_face1 I used the top of the firecracker from Stars and Stripes SVG Kit and sized the lid from the firecracker to W 5.153 x 2.898 H. I did not use the top for the wick. Cut it out and help it shape a curve by "curling" the paper a bit with a pencil or dowel. You will be gluing the flaps to the inside of your hole. See picture. This will hold your tea light into place by making it fit snugly. I rolled the paper and inserted it into the hole first then glued the side into place. Fold your flaps down to the inside and add a bit of glue under each. Take your time as you do want these to stay into place.
I cut a square W 4.126 x 3.982 H of Stampin Up's Card Stock Vellum. This is my favorite vellum to work with for windows and things like this. I used vellum adhesive to glue it into the inside of the crate_face1. I almost always have a bit of trouble getting things like this not to warp when I glue them but I have found that if I glue the long part of these first taking my time and then the ends I get a lot less warp to them.
Now for the stripes I used the crate_board1 and duplicated it again. You will need two short or at the size they import, red boards and one white short board. I used vanilla colored American Craft Card Stock but you could use white as well. Cut one vanilla and one red board sized at W 14.195 x 3.685 H. These are your long boards. You will have to place it diagonal on your virtual mat to get it to fit. Assemble your boards and ink edges with Tim Holtz vintage photo ink.
Lay them on your work surface and decide how far you want them apart. You do not have to be precise as it adds a bit of rustic look to it. I used 2.50 inch burlap ribbon to hold the flag together by hot gluing the stripes to it first. Then I folded the one for the blue portion of my flag in half and cut a triangle out, when I opened it up it fit perfectly over the circle for the tea light. I hot glued it all into place and added a few thin lines on the sides of the stripes and pressed the blue portion together. The striped ribbon was from stampin up but I believe it has been discontinued. Any great ribbon will work for this. I used Linen thread to make the bows tied around the strap ends. Cut three different shaped stars and use your 3/16 hole punch to tie the thread through, Frey the ends for looks. The stars are also a layer of three each and inked with vintage photo. The rusted star was one I had but have found that factorydirectcraft.com has quite a few rusted and wonderful craft supplies at a fair price.
Well that is my rustic flag and I hope you love it as much as I do. I could not get a good photo of how much the stars light in the dark, but it is quite nice. I would love to see a picture if you decide to make one, you can post it on my Facebook page Shara's Paper Creations. Thanks so much for stopping by and reading my blog. I have more rustic Americana ideas to share with you so stay tuned, and Happy Craftin' Y'all!
Blessings, Sharalyn
SVG Kits used:
Caramel Apple Pie SVG Kit
Stars and Stripes SVG Kit
Supplies Used:
Bazzill Card Stock: Admiral, Ruby Slipper
American Craft Card Stock: Vanilla
Tim Holtz Vintage Photo Ink
Stampin Up Card Stock Vellum
Stampin Up Linen Thread
2.5 in. Burlap ribbon
Ribbon from Stash
wooden button
Rusted Star
Hot Glue
Scotch Quick Dry Adhesive
One Battery Operated Tea light
Silhouette Cameo
Subscribe to:
Posts (Atom)