svg cuts banner

Monday, June 6, 2016

Just thinking outside the Chess King Box

Afternoon All!
Take a walk down to the barber shop and get a haircut and a shave! While looking at the new kit King of the Castle I got the idea to make the Chess King Box SVG into a Barber Pole. I have another idea brewing but I won't give that one a way for a while yet! Let's get to cutting!

I cut the Chess King Box all out of white cardstock.  Using some Doodle bug paper for the 4th of July, I cut the accent pieces removing the lines and cut outs by ungrouping and deleting them. Instead of using the last patterned piece for the top outside of the box I cut another main_2_black using white cardstock and adhered that to the top of the other. I cut the octagon from the cross_white and another octagon .25 smaller than the first to put on top of the first octagon. The top of the Barber pole is made using a white pebble, a button and a spare parts knob from Hobby lobby. I adhered them to each other using Ranger Glossy Accents.
I cut the two side pieces for main_1_black out of sliver foil cardstock from Michaels and cut an extra main_2_stone out of white then embossed it with sizzix flourishes emboss folder.  The last step was to put sticky tape to a 1/4 white ribbon and adhere it around the bottom. Follow Leo's Video on how to put it all together and your all set with your barber pole.

Make this for your dad who cut your hair in the backyard or that dad who collects barber memorabilia. Either way you cut it, your going to come in looking pretty spiffy with that gift for dad and you'll be king or queen for the Day!
Happy Father's day y'all and Happy Crafting!
Blessings Sharalyn


King of the Castle SVG Bundle

Supplies
American Craft Card Stock White
Doodle Bug: Stars and Stripes Collection
Recollections: Silver Card Stock
Sizzix Emboss Folder: Flourishes
Ranger Glossy Accents
Spare Parts: knob
1/4 White Ribbon
White Pebble
Button


Note: When ever trying to match stripes or plaids allow for extra paper.


Saturday, June 4, 2016

Let's Go RV to The Great Outdoors!


Afternoon Y'all!
Carta Bella came out with a collection called The Great Outdoors.
It made me think of the trips we took to Silver Lake and Sequoia National Park. I have been going to Sequoia National Park since I was knee hi to a grass hopper.  It was a joy to share the Gigantism's with my then soon to be husband. Watching him walk up to one and look up was a memory I will treasure the rest of my life. This paper makes me think of the wonderful times we have had on our vacations and our many adventures.
My mind spun is so many directions with this paper and if Mary had gotten the old truck designed it would have been even harder to make the RV  from Dreaming Tree instead of the nifty trailer she has made and a truck to pull it.  She hasn't gotten it designed yet, so I made the RV from Dreaming Tree but I was not disappointed with the way it turned out. Sometimes there is so much to play with it is hard to decide what to make first!

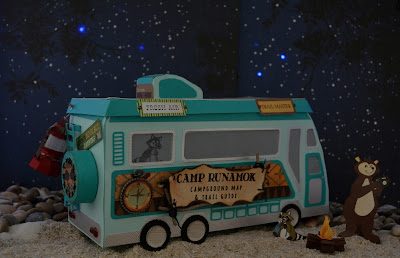
I cut the trailer using Bazzill and American Craft Card Stock. I purchased the stamp set and ephemera as well to use with this RV. I wanted to stamp the bear and the squirrel as if they were riding in the RV. The ephemera was so I could use it on the RV to add to the theme of going on a vacation and in this case to camp. I love the name of the camp to Runamok, so cute!
I  used various badges from one of the papers and cut the odd shaped ones out by hand. For the round badges, I used my Epiphany craft 25 circle and the bubble caps. Each badge was inked on the edges and adhered with a dimensional from Stampin' Up to the side panel of the RV.  I used the Stop and Smell the Flowers stamp on the lower part of the RV. This stamp comes with the words stacked so I carefully cut the stamp down the center to get more use from the stamp. You could cut all the words apart as well, as long as you don't cut the letters this will be fine.

I altered the awning a little by taking out the circles and using my Martha Stewart Scoreboard I make small score lines between the circles. I was not careful when I got to this point and put the awning a bit to high so my lid doesn't fit quite snug as the design was intended. There is a small score line that shows where the awning should be placed. Pay more attention to it than I did and your lid will fit better. I got distracted with my next thought. ( Opps, yeah it happens. )
I wanted small metallic adhesives for the handle on the door but I don't have any that small or sliver, so I used Ranger liquid pearls. If you put your drop of liquid pearl down then tap underneath the paper where the drop was laid, it will flatten to look like an adhesive pearl. The silver textured paper was purchased at Michaels on my recent outing with my girlfriend. That gave the trim the texture I wanted and added to the wheels as well. I had been given a ton of stuff a few yrs ago and one of them were the bubble caps that fit the hubs of the wheels perfectly. woohoo! They are from Memory craft and called page pebbles, I do not know if they still make them.The ephemera was used at the top and accented with Echo Park enamel dots. I will list the collection they came from below. (I have a huge stash of enamel dots because I love using them.)

I used a clock arrow from Spare Parts (Hobby Lobby) on the top to make the "You are Here", indicating the tent. I added the Lodge ephemera to the top and the Outdoors to the front. Moving to the back of the van I used more ephemera for the back. Before putting the little spare tire box together I glued the circle of buffalo to the back then using my "pokey tool" (my stampin up gals term) from Stampin' up I made holes to stitch the buffalo to the top of the box. The thread I used was a black hemp twine from Close to my Heart. ( some of the stuff that was given to me) I used the silver textured paper for the bumper and added red glitter enamel dots for the tail lights. I still think I should have done the ladder in the silver paper and I may change it  The lantern was made using SVG cuts Camp S'more svg kit.  I made vintage camp lantern as small as I could still see it to put it together. I tried one that would have been a better size but I couldn't see it well enough to put it together. A small silver eyelet was put into the top back of the RV lid and linen thread from Stampin up was used to tie it to the back of the RV.

For the last side I used more ephemera on the top and added tiny brads to the sides using the "pokey" tool. I wanted to continue the Native American theme so I cut the camp Runamok sign out and then took it outside. I can remember seeing my mom do this with something she was making when I was a young girl. She used a match and lit the side of the paper on fire. When it had burned to the desired look she had a damp paper towel to put out the fire. I did this around the edges then poked holes in ends and tied it to sticks. The sticks were tied together first, then the sign was attached to the sticks. I adjusting the sticks to the desired look and glued them into place. I liked the compass ephemera, so I inked it with Tim Holtz Vintage Photo then glued it into a frame from Bead Landing and adhered a 25 bubble cap from Epiphany Crafts. The frame was attached  to the side of the RV using Ranger Glossy Accents. I used more glitter enamel dots for the front fog lights. I know we were supposed to put them in the bumper but it didn't look right to me, so I put it where I thought I had seen them.

Last and certainly not least, the fire box is from a kit called Camp Firefly svg. It is another of Mary's wonderful creations along with both kits I mentioned have such adorable stuff to go with them. You need to check them out as well. The fire box is made mini sized as well to fit the whole theme of this paper collection and RV. The bear and the raccoon were stickers I attached to cardstock then hand cut and added a stand to it so I could used them in the photos.

That is my RV from Dreaming Tree and Carta Bella, I hope you enjoyed it as much as I enjoyed making it. I could have made so much more to go with it but you have to stop somewhere right? (like a canoe for the top)  I may have to make a trailer using this paper as well and who knows? if Mary Rudakas makes the truck that Katie Smiley and I want so bad I will just have to add that to my display in my room. Thanks so much for stopping by and reading my blog. I had a nice visit with you all.  May you have or make fond memories of a vacation gone by.  You could mark it with this RV and put photos of the people inside the windows along with signs for the outside of the places you visited. Let your imagination go wild and take you on an Adventure of making an RV from Dreaming Tree. Thanks for visitin' with me and Happy Craftin' Y'all!!!
Blessings, Sharalyn

Dreaming Tree SVG
Walt's RV SVG

SVG Cuts
Camp Firefly SVG Kit
Camp S'more SVG Kit

Supplies:
Carta Bella: The Great Outdoors Collection, Woodland Stamp Set
American Craft Card Stock: Aqua
Bazzill Card Stock: Turquoise Mist, Blackbird, Blush Red Dark
Recollections: Silver textured paper, Mini Metallic Brads
Stampin Up: Card Stock Vellum, Dimensional's, Linen Thread
Stampin Up Ink: Bermuda Bay, Chocolate Chip, Island Indigo, Rich Razzleberry
Tim Holtz: vintage photo
Memory Craft: Page Bubbles
Archival Ink: Jet Black
Close to my Heart: Black Hemp Thread
Echo Park: The Story of Fall Enamel Dots
My Minds Eye: Lost & Found Record it, Heirloom, Antique Enamel Dots
The Paper Studio: Spare Parts Clock hands( Hobby Lobby)
Ranger: Glossy Accents, Liquid Pearls
Bead Store: Metal Frames (Michaels in the bead section)
Sticks from our pine trees ( it had fallen)
Kool Tak: Clear 3d Squares
Martha Stewart Scoreboard
Scotch Quick Dry Adhesive
Silhouette Designer Addition
Silhouette Cameo


Sunday, May 29, 2016

Prince to Princess Card

Evening all,
I am excited to share with you my "king" card made into a princess card. It could be made king, prince, queen, or princess. While making this I started to even think of a cute little monster theme. something like the Muppets would have.

All I could think of when I saw this card was pink, blue. As if I could hear the fairies in the Disney movie, Sleeping Beauty fight over the color of the dress.  What little princess that you know doesn't love the Disney movies and pretending she is the princess. Grab your cup of tea or coffee and lets look at this wonderful card.

 I used American Craft card stock in colors lip-gloss, sky to cut the card out.  I used silver glitter paper from Michael's to add the glitz to the card but keep it elegant. This is a small glitter grade and not a large one. I prefer to use something a little less tough on my blades and my machine. I like the weight of this card stock as it is not thick. Glitter is a must on something for a little girl or even a big girl loves glitter. To add this to the card I used Tim Holtz, star dust stickles. I used it around the windows, on the shingles and  around the gate or greeting opening.
 Looking at the card, I  felt that the card  needed some texture.  I cut a second center castle and using my scissors I cut the portion just below the tower and just above the windows for the smaller towers off. I ran the lower portion through my big shot using Tim Holtz bricked emboss folder. I used the same bricked emboss folder on the castle opening. For the roof of the center tower used Cuttlebug tiny bubbles emboss folder. I adhered each piece with kool tak clear 3D foam adhesives.

 On the vellum window I wanted to continue the pink, blue theme and made half of the window pink and half blue. To achieve this I used Tim Holtz distress inks colors, pickled raspberry and salty ocean. I blended the pink first and then the blue. You can add more to each color blending to the middle to get a more vibrant look.
I made the gate white and added lines to it using my Martha Stewart score board. To give the "boards" some depth I used my Copic marker C3. There was never any question about using rhinestones, this was also a must for me as I thought about the jewels that go with being a princess. Stamp or write a greeting under the gate and you have a wonderful card that will make any princess happy.

As I put this card together I was extremely impressed with the design aspect of it and yet it is so easy and fast to put together. As with any project the tough part is choosing the papers. I look forward to seeing your rendition of this amazing and yet simple card. Thank you for stopping by and reading my blog. I hope you enjoyed my princess card and may all your dreams come true! Happy Craftin' Y'all!
Blessings, Sharalyn


3DSVG Used:

King of the Castle Cascade Card SVG


Supplies:
American Craft Card Stock: Lip-gloss, Sky, White, Wave
Recollections: Silver Glitter Paper, Clear Rhinestones
Stampin' Up: Card Stock Vellum
Tim Holtz Distress Inks: Pickled Raspberry, Salty Ocean
Tim Holtz Emboss Folder: Bricked
Cuttlebug emboss Folder: Tiny Bubbles
Ranger Stickles: Star Dust
Hero Arts: Light Blue Rhinestones
Copic Marker: C3
Kool Tak 3D Foam Adhesives
Scotch Quick Dry Adhesive
Silhouette Designer Addition
Silhouette Cameo

Friday, May 20, 2016

Time for Graduation Cards!

Morning everyone!
Today I am bringing you a quick card I made for our Riley who is graduating from the 6th grade and becoming a teenager. Where does the time go? This is one of our 6 grandsons and the third to become a teen, before I know it I will be making wedding cards for them! I say it was quick as I used the  You're Invited SVG Bundle from Dreaming Tree and turned it into a "grad cap" so to speak for Riley. Grab a cup of Coffee or Tea and lets get started on this card.

Using the Scroll Greeting Card I cut the card from black card stock, then added Brilliant gold ink to the outside and inside of the card base. I  used my cut and print feature on my Silhouette Cameo, to made the greeting for Riley's Card.  I made a tassel for the band that goes around the card and instead of making the flower I made 5 donut shapes and then two solid circles to be glued on top of the brad.  Glue the 5 donut shapes together one on top of the other, then after you have made your tassel put the loop through the hole and a brad as well to hold the loop in place. Glue the two solid shapes together and adhere to the top of the brad. Adhere that to the top of your glued band. I used a solid piece of card stock for the front of the card to hide the words instead of a piece of vellum. This gave it a more masculine look and added to the look of the grad cap.

I could have removed a lot of the scrolls on the front to make it more masculine as well but Riley is very creative and I thought he would like it that way. That is my quick card and I hope you enjoyed it. Riley I am sure will love it because grandma made it. He is a sweet quiet boy full of smiles for me anytime we see him, but then so are all of my daughters boys! I don't get to see the others enough as Chris is still in the Navy serving our country for 18 yrs. I couldn't be more proud of both of my kids and grandkids. I will get to see the other two this weekend for an entire week! I am so excited.

On this memorial week coming up take time to thank a service man or woman for their service to our country and for protecting your freedom. Thanks so much for stopping by and reading my blog. Have  a wonderful week y'all and Happy Craftin'!
Blessings, Sharalyn

3D SVG Used:
You're Invited SVG Bundle

Supplies Used:
Recollections: Black Card Stock, White Card Stock
Brilliant: Gold Ink
DMC Embroidery Thread: Color #725
Black Brad
Scotch Quick Dry Adhesive
Silhouette Designer Addition
Silhouette Cameo
Printer

Note: To make the tassel you can Goggle how to make a tassel or do a search on Youtube

Sunday, May 15, 2016

Bring a little Sunshine to someone's Day!

Afternoon all,
Today I am bringing you a little book mark courtesy of Dreaming Tree. As I went to cut this free bookmark, I noticed there was another version of it as well in the file and it is quite lovely. Make a visit to Dreaming Tree and check out all the great free designs as well as all the other designs you can purchase. I promise you wont be disappointed. Lets get started..

I had already planned to make the base of the bookmark white and using my distress inks make a sunrise so to speak. Always start with your lightest color first and finish with your darkest color. Remember you and always go back and add more color if it isn't what you were hoping for. It didn't quite turn out like a sunrise but I think it is still very pretty. I added squiggles, (technical term) to the areas between the rays to give the effect of heat waves using a clear Wink of Stella Pen. Here in the High Desert of California I have seen heat waves quite often in the summer time.

After I blended the distress inks onto the white bookmark I let it dry a bit then glued the sun to the bookmark.   Add your squiggles for affect and make your tassel for the bookmark. I used some special fibers I had in my stash.  You can google how to make a tassel or go to svgcuts.com and click on the tutorial for Graduation Day SVG Kit. Mary explains how to make the tassel in the tutorial for this kit. I will have a card version using a card set from Dreaming Tree in a few days.

 Add a person note of encouragement to the back and send it to someone you know is having a hard time or just needs to know your thinking of them. That is my bookmark, nothing fancy but I had a nice time making it. I apologize for my absence I have been painting and redecorating my living room. (consisting of new pillows and revamping some glass décor I already had).  I am working on my fifties kitchen and sprucing up our bathrooms as well. All this in preparation for my son and his wife and our grandsons to visit this month! My mom and dad will be visiting in the fall. It has been very hard work but I am grateful that we are able to do this now.

Thank you for stopping by and spending this lovely Sunday with me. I am off to make my very own (pumpkin, Leo's Cat) Kitty Bag, another great freebie from Dreaming Tree. Have a wonderful day and Happy Craftin' Y'all!  Blessings, Sharalyn

3dsvg Used:
Dreaming Tree (free bookmark)

Supplies Used:
Bazzill: Smooth White Card Stock
Recollections: Black Card Stock
Tim Holtz Distress Inks: Dusty Concord, Pickled Raspberry, Spiced Marmalade, Squeezed Lemon, Dried Marigold, Wilted Violet, Black Soot.
Wink Of Stella Pen: Clear
Fibers from Stash
Scotch Quick Dry Adhesive
Silhouette Designer Addition
Silhouette Cameo

Thursday, April 28, 2016

Love You Mom, Americana Style

Mornin' Y'all,
Today I am bringing to you some Americana, courtesy of Dreaming Tree's (3dsvg.com) Love You Mom Bundle. This bundle is amazing all on it's own but when I saw it I thought of my mother in law who was born on the 4th of July. That is independence day here in America and our first year without her, so in honor of her I made a Love you Mom Hydrangea Tray Americana style.  Happy Mother's day to you Joan, we love you with all our hearts!

To change the center panels for the flower pots I ungrouped and release compound path, then moved the letters off to the side. I used the star shape from Star Gift Box to replace the letters by placing the star in the center of the panel and then making a compound path. Each panel was inked on the edges and to the front a bit with Tim Hotlz vintage photo ink. The same ink was used on the boxes as well as the sides and front panel for the tray and the vanilla flowers. This is to give it the vintage Americana feel. I used the star that goes on the front of the Star Gift Box to bring out some dimension. Cut the panels from your chosen pattern paper.  Each star was cut from ruby slipper, vanilla and admiral card stock. A thin covering of Star Dust Stickles was added to bring out the stars.

The lids for the boxes were cut using the same red, vanilla, and blue theme. I started with the lids all being vanilla just as they are similarly on in the instructions but it just didn't pop to me, so they were changed. The flowers are cut from the same three colors and white pins were purchased and inked with my E37 Copic Marker. I knew when I purchased them I would be changing the color. Another cute idea would be to make them red white and blue on the different flowers. You can change the color of any peal or clear rhinestone by using a permanent marker.  But it is your design so you do what appeals to you most. The leaves were cut using Bazzill Rain Forest and inked with Always Artichoke from Stampin up. I chose a darker red and blue to ink the flowers. The Brackets were cut using the Ruby Slipper from Bazzill and Hero Arts Metallic Décor blue adhesives where added to the holes.

I started this whole project thinking of my mother in law for Mother's Day and ended with thinking about her again this time what would have been her 96th birthday. So here is to you mom, Happy Mother's Day and Happy Birthday you are in our hearts forever. Thanks for stopping by and reading my blog, Have a wonderful Mother's day and Happy Craftin' Y'all!
Blessings, Sharalyn

3D svgs Used
Love You Mom SVG Bundle
Star Gift Box SVG

Supplies Used:
American Craft Card Stock: Vanilla
Bazzill Card Stock: Rain Forest, Ruby Slipper, Admiral
Little Yellow Bicycle Card Stock: Vintage Summer Collection
Hero Arts Metallic Décor: Blue
Ranger: Star Dust Stickles
Copic Marker: E37
Tim Holtz Distress Ink: Vintage Photo
Close to My Heart: Barn Red, Outdoor Denim
Stampin Up: Always Artichoke
Lineco Neutral pH Adhesive
Silhouette Designer Addition
Silhouette Cameo

Star Sizes
Star cut out/ panel: W 1.545 x 1.466 H
Star Center: W 1.009 x 1.061 H

Sunday, April 24, 2016

A Card with Thought

Hey Y'all,
It is another lovely Sunday afternoon here in Joshua Tree. The blooms are winding down and so are my allergies. Just a note to those who may want to duplicate my designs, I do use Silhouette Designer addition and Silhouette Cameo. These machines and the eclips are capable of doing the actions described. If you use a Circut you are limited in the actions you can do or you will need to figure out the best way to achieve the same result. It was pointed out to me the some had been confused by my instructions, this may have been because our machines are different and require different actions to get the same result.

I wanted to share with you my gift in a card so to speak. I liked the Blossom Tag that was the freebie on 3dsvg.com (Dreaming Tree) but decided it needed to be a card and gift as well. I made the front edge of the card to tear off to be used as a bookmark for future use. This way the person will have this keepsake for a long time.

Order and download the free tag on Blossom Tag (Free SVG). Bring the tag onto your virtual mat and ungroup and release compound path. Group the center cut pieces together so you don't loose any when you are moving it to the larger tag shape. Holding down the shift key choose the cut out for the ribbon and the body of the tag, group those together or make a compound path. Duplicate the tag shape and make one larger. All cut sizes will be listed at the bottom of this post. Move the larger one off the side.

Using the other tag move the grouped cut pieces back over it and size the cut pieces to fit into the new sized tag. Select the tag and the cut pieces and make a compound path. This is your new bookmark. Bring the larger tag over to the one and slightly overlap the side pieces just so they can be welded together. Draw a perforated line down the center of the now tag card and group.
I cut a slightly smaller piece of card stock vellum to glue to the back of the bookmark then backed that with another piece of patterned card stock. You could omit the vellum and just use the patterned cardstock if you would like.
The flowers were cut first at the larger size then another smaller size to glue one onto the other. This gives the flowers and front of your card a little more depth. Once it becomes a bookmark the flowers will flatten with time. I added enamel dots to the center of the flowers after the edges were inked with Tim Holtz stormy sky distress ink. The bird was given a little color as well using the same distress ink. I used stamp n' write makers, Soft Suede, Sahara Sand, and Lucky Limeade from Stampin Up to add some lines and color to the leaves, branch and bird. My bird then received a eye using Ranger Enamel Accents Black.
A handwritten message was added to the bottom of the bookmark, then a stamped greeting was added to the inside of the card. Let your recipient know they can tear the edge of the card to allow it to become a bookmark.
Just a small project but one with a  lot of thought and I hope you agree, heart. Thank you so much for stopping by and reading my blog. Your thoughts and comments are much appreciated. I hope you like it and if you do decide to make one I would love to see your version of my little card/bookmark.  Have a lovely Sunday and Happy Craftin' Y'all!
Blessings, Sharalyn

3dSVG Used:
Blossom Tag (Free SVG)

Supplies Used:
K& Company: Merriweather Pad
American Craft Card Stock: Vanilla
Tim Holtz Distress Ink: Stormy Sky
Ranger Enamel Accents : Black
Echo Park Enamel  Dots: Hello Winter Collection
Stampin Up: Card Stock Vellum
Stamp n'Write: Sahara Sand, Soft Suede, Lucky Limeade
Copic Marker: Multiliner Marker Blue
Ribbon from Stash
Scotch Quick Dry Adhesive
Silhouette Designer Addition
Silhouette Cameo

Cut Sizes
Tag_ W 2.392 x 4.890 H cut one
Tag_ W 2.331x 4.890 H   cut one
Large Flower W 1.650 x 1.654 H cut one
Large Flower W 1.362 x 1.366 H cut one
Small Flower W 0.812 x 0.813 H cut one
Small Flower W 0.672 x 0.663 H cut one