svg cuts banner

Friday, January 17, 2020

Never to late for a little Christmas

Hey Ya'll
I have had a crazy past year with under slab water leaks, painting, broken ankle and much more. This was the reason I was not crafting much as everything that was in my living room was temporarily in my craft room. All is well now and I have a beautiful new floor and my home is really starting to look the way I always wanted.. Thank God for a New Year and a fresh start.

 I am crafting like crazy so I have two snow globes to show you. My first one ever was a learning curve.  I have since altered the design a bit to make it sturdier and to help it hold the shape with the Acetate.  This smaller globe is for a couple of very special friends, the larger is for my girlfriend whom shares my love for snowmen. Both are belated Christmas gifts as I couldn't decide what I wanted to make for either. The snow globes are from a very creative lady named Corrina. Her shop is Creatieve Papier Uitspatting Lets get started..

I have included the links for the items I purchased but you will need to create your own account if you want to purchase Cornnia's Designs.

Snowglobe with Christmas Truck
My choice to alter the tabs was because I made the design so small. In the open design I found the side pieces for the globe and extended the length of the tabs just a tad. I did this so the tabs would hold better with the use of the acetate. I also decreased the size of the cut out for the acetate so the side pieces would be just a little wider. In my opinion this added stability to the design when using acetate. This already can be a difficult product to work with and finding things that will hold it and not make a mess with the acetate is difficult. I find using 1/8 inch score tape that I purchase in multi packs from Amazon is very efficient to use with Acetate. Line the sides, top and bottom with score tape and pulling one side of the protective paper off the score tape at a time as you line up to your frame. Continue removing the protective paper from the score tape as you line your side pieces for your globe.  Place another layer of score tape onto that to hold your sides together. While constructing your globe place another line of score tape to the connected sides and apply the frames to hide your tabs. Remove the protective paper one edge at a time with the frames as well while constructing the globe.

Snowman with lantern
Once the globe is constructed you can construct the bottom for your globe and put on the panels. I purchased the snowman as well from her page. I have made this little guy three times but once as the design imports. Corrina makes things large as a rule.  Always check to see what size your pieces are on the mat so you can decide yourself if you would like to scale the size down. I scaled this snowman down to 30 % of his orginal size. The nose pieces were to delicate for me to remove from the mat in once piece so I opted not to use them on the snowman inside the globe. I had thin strips of paper to make the eyebrows and mouth. The candle inside the lantern was made using small piece of an air can straw. I glued it to the inside of the lantern and added a small piece of yellow vellum to the top for the flame. Buttons, ribbon, rhinestones and donut shaped embellishments from my stash were added to dress up my snowman. I added a tiny bell to the top and perfect pearls white opal dimensional paint were added for a snowy affect. Stickles waterfall was added to the top of that.
I had a very small bottle brush tree in my stash and added that with snow for Christmasy affect.  Just add some glue and sprinkle the snow on top.

I did alter the top piece for the globe to make it a little larger and added a slit to the top. The snowflake was from the ecal winter shapes menu and a rectangle was welded to it to make the piece you would put through the slit. I cut two glued them together leaving the bottom of the rectangle free to adhere the ends to the underside of the top flower piece. I added lace around the globes at the bottoms of both globes to give a finished look.

 These are my snow globes, I hope you enjoyed them.  I will list supplies on the bottom of this post, sizes will not be listed as it is your choice what size you choose to make it. Thank you for stopping by and reading my blog. Have a look around Corrina's shop she is quite talented and I have enjoyed her designs for a couple of years now. Thank you again and Happy Craftin y'all! Blessings Sharalyn

Creatieve Papier Uitspatting
Snowglobe with Christmas Truck                                      
Snowman

Bazzill Cardstock
Blackbird
Ruby Slipper
Evening Surf
Pumpkin
Avocado
American Craft Cardstock 
White
Carrot

Ranger
Stickles: Perfect Pearls White, Waterfall, Stardust
Queen & Co : donut shaped embellishment
Hero Arts: Rhinestones
Heidi Swapp: Silver bullet Adhesives

Red, White and sliver lace from my stash,
Acetate from Office supply
Scotch Tacky Glue
Ecal
Sizzix Eclips 2 cutting machine.

Snow you would purchase at Christmas time. I try to buy the iridescent snow.

Monday, January 6, 2020

Winter Snow Owl Keepsake Box

Morning all,

I have been asked for this design several times lately. Here is all the info. I made this owl 5 years ago by request of SVG cuts. Please enjoy this design as it is a fairly simple one. Stay tuned I will be finishing up my latest project and posting it soon. Thanks for stopping by
blessings Sharalyn Morgan

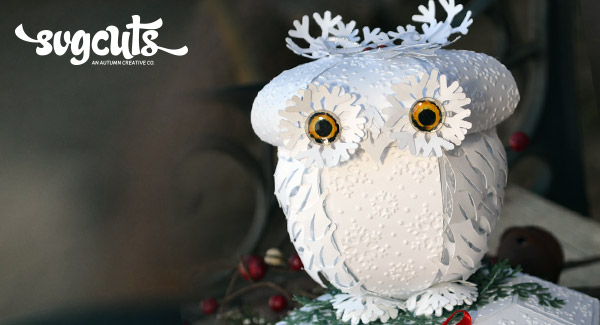
Winter Snow Owl Keepsake Box by Guest Designer Sharalyn Morgan

Pin It
sharalyn-owl-hero
This winter owl is sure to impress this year.This snow owl sits atop a soap box waiting for you to open the box and find a treasure inside. There is something about this face that makes the person looking at it say, look at that and is that paper?

Instructions

  1. Choose the color you would like your owl and cut the Acorn from Acorn Autumn SVG Kit according to size on excel sheet.
  2. Open the accents for acorn lid,delete the stems and the piece the stems are inserted into. Emboss the accents with the embossing folder and glue onto Acorn. Glue the lid and bottom of Acorn together with hot glue.
  3. Open the White svg file from December Door hangers SVG Kit and ungroup, you will be using just the snowflake from this file. Glue three snowflakes together for strength. Glue two more snowflakes on top of the three angled so that it looks like fringe. Shape the snowflakes for the feet into a cupped down position. These will be the feet for the owl. Hot Glue those to the bottom front of the owl, fairly close together.
  4. Use a pencil or a stylus shape all holly leaves in a curved up position. Begin gluing larger holly leaves on the bottom back middle portion of the Acorn. Angle the holly leaves as you glue in the shape of a birds tail. Glue 4 rows like this, then on three of the holly leaves about the middle portion of the tail, glue an extra holly leave on each one. This is to give the look of long tail feathers.
  5. Use the Small Holly leaves as your body feathers. Glue sides at an angle toward the back of the owl for the illusion of wings. Sides of the owl feathers on done straight down starting at the bottom of the Acorn and work toward the top. On the back of the owl, glue the small holy leave straight from the bottom toward the top, add a few angled small holy leaves to the sides.
  6. Glue two Snowflakes together in an angled position as you would a flower. Use the Y13 Copic Marker and color in the center of your snowflake. Around the inside edge of the Y13 draw a circle with YR23. Go back over the circle with Y13 while it is still wet to blend the colors. Do this to both snowflake eyes. Just around the edge of the of the outer circle lightly draw a black edge. Use a regular hole punch and punch two small black circles for the pupil. Adhere to the center and use Glossy accents to affix the Epoxy over the center of each snowflake. Hot glue the eyes in place.
  7. Shape 4 snowflakes into a cup shape. Hot glue the snowflakes that are to be the ears in place at an angle with one in back of the other. I angled mine for interest.
  8. Cut a small Holly leaf in half and hot glue between the eyes pinching the sides a bit to give the beak look. Use one of the snowflakes and cut with scissors the tips off. curve them a bit and glue about 4 around the top of the beak to give the ruffled feather look.
  9. Glue 4 holly leaves onto the top of the head between the ears and add the Enamel dots for berries. Glue on a bow.
  10. Cut the soap box lid svg and emboss your accents with a snowflake pattern emboss folder. Glue together.
  11. Cut the bottom box svg from patterned paper and glue it together. Ink your edges to give a polished look.
  12. Put the lid on the box and glue the ferny greens cut at the size on the on excel sheet to the top of the box. Lay one long piece of ferny green on the long top side of the top of the box and the same on the other side. Glue two med ferny greens in the middle of that on both short sides. Now hot glue your owl body onto the top of the box. Try to be careful with the amount of glue you use. You want the owl to be secure, but not so that you can't hide any glue with extra ferny greens. Fill in areas that need it with med and small ferny green pieces. This is so the owl looks like he is sitting on a nest or a tree branch. Some of the fill in pieces can be curved up a bit with your pencils or stylus.
  13. Glue a bow onto the front or desired embellishments.

Dimensions

Autumn Acorn SVG Kit (Acorn Folder) QTY
acorn.svg 10.761 W x 10.761 H Solid Card Stock 1
bottom_panels.svg 6.106 W x 8.316 H Solid Card Stock 1
lid_panels.svg 7.624 W x 4.729 H Solid Card Stock 1
December Door Hangers SVG Kit (Penguin Folder)
white.svg 1.297 W x 1.376 H Solid Card Stock 18
Shaped Christmas Cards SVG Kit (Holly Folder)
green_leaf.svg (A2) 0.913 W x 2.492 H Solid Card Stock 10
green_leaf.svg (A2) 0.719 W x 1.962 H Solid Card Stock 85
3d Wintergreens SVG kit ( Evergreen-Ferny Folder)
evergreen_ferny.svg 30555 W x 4.281 H Solid Card Stock 8
Honeybee Tea SVG Kit (Soap Box Folder)
lid.svg 11.4 W x 11.4 H Solid Card Stock 1
lid_panels.svg 3.5 W x 2.635 H Solid Card Stock 1
bottom.svg 9.4 W x 11.4 patterned Card Stock 1
base.svg 10.2 W x 9.698 H Solid Card Stock 1
  • My Minds Eye Sliegh Bells Ring Collection
  • American Craft Card Stock
  • Bazzill Card Stock
  • My Minds Eye Enamuel Dots Lost and Found Collection
  • Tim Holtz Snowflake Pattern Emboss Folder
  • Copic Markers - Y13 Lemon Yellow, YR23 Yellow Ochre, 100 Black
  • Epiphany Crafts 14 Circle Epoxy 2
  • Ribbon
  • Scotch Quick Dry Adhesive
  • Hot Glue
  • Detail Glue Gun

Design Tips

Sharalyn Morgan - Guest Designer
  • Keep the owl one or two colors. This makes the owl become the focus and not the paper you used.
  • When choosing an embossing folder think about it adding texture and setting to the owl.
  • Using a mouse pad under your paper when shaping with a stylus helps the paper to shape easier.
  • Use Glossy accents to adhere the eyes as the epoxy sometimes comes off with heat and you wouldn't want your owl to be winking when the gift is opened.
Watching this owl come to life made me smile and will be sure to bring a smile to the recipient as well. Hoo every you give this to will love it! I hope this encouraged you to not be afraid to try something with more detail. I know you can do it!